Thursday, June 30, 2011

Huevos Rancheros (or something like it)

Yesterday, I missed breakfast.   I had to go to the grocery store, run errands, pick up Tommy from VBS.  Why am I telling you all of this?  I don't know, but it does lead up to a really yummy brunch!  I decided to make myself a quick version of Huevos Rancheros.  Here's what you need.  (Sorry, no picture this time, but it's easy)

Ingredients:
1T Cooking Oil
1 Corn Tortilla
1 Egg
2T-1/4C Black or Refried Beans
2T Shredded Cheddar
Salsa, El Pato or Ranchero Sauce to taste
Dollop of sour cream, if desired

Remember a couple of days ago when I 
recycled my cooking oil?  Well, today that
came in handy.  BTW, it didn't have any weird taste!
I scraped about a Tablespoon out with a spoon. 
It's been in the freezer, so it's hard.  I don't know what
the deal is with my camera.  These pics are awful.
Throw that into a pan over med-high heat.
Use your skankiest pan possible so all the world can see
how badly you've treated it.  Go say a Hail Mary.
When oil is hot, throw in your tortilla.  
Or 'tor-tee-lee-uh' as my old boss liked to say. 
When golden and crispy, flip over and do the other side.
 Take it out when the other side is done and drain on a paper towel.
I know, I know, I'm not supposed to be using paper towels!  What...
I'm supposed to go cold turkey here?  I figure it's probably kind of
dangerous to wash an oily rag or towel. Could send the dryer up in flames.  
I'm certain I'm saving my family from a horrible fate by doing this.
When you're done with your tortilla, fry up your egg in the same pan. 
While that's a-fryin', slap a few black beans on your now-crispy 
tortilla.  As many or as little as you like, 
as long as there's exactly seventy one.  Ha!
Next, lay down that lovely, over-easy fried egg!  I know...it doesn't 
look over easy.  I smashed up the yolk a bit.  
That's okay.  It's on the inside that counts.  Really, it is!
Then grate some of that lovely sharp cheddar on top of your egg.
Then pour on your salsa of choice.  I'm using El Pato.  
Have I mentioned my steamy love affair with El Pato?
Can't get enough of it.  Try it.  It's so good!  If this picture
weren't going to be posted here, I would have drown 
the entire thing with it while you weren't looking!  I may
have done that afterward.  You'll never know!   (?)
If desired, you can put a little dollop of sour cream on top.
It honestly didn't need it. Everything else was so darn tasty!
Notes:
And that was my lunch yesterday!  Doesn't it look down right tasty?  It was soooo good!
Ah-hem, I may have even had a second one. Gimme a break.   I didn't have breakfast!

I believe 'real' huevos rancheros have refried beans on the bottom.  They may even be made
with soft flour tortillas.  And have real ranchero sauce.   I don't care.  I love mine!  So, there!

Coming in at a whopping 40 cents each, it's a pretty cheap breakfast/lunch.

Tuna Noodle Casserole

Or as I like to call it....Toonie Casserole.  Once in a while, I have this overwhelming yen for it.  I'm fairly certain this is my body telling me I need the vitamins and minerals the tuna offers.  Most of the time, my body just tells me it needs brownies.

Here's what you'll need to make it:
Ingredients:
1 Can Tuna, drained
2T+ Diced Onion (or to taste)
1 Can Cream of Mushroom Soup (or 1 1/2C homemade)
1/4C Milk
2C Noodles of choice, uncooked
1/4-1/2C Sour Cream (or to taste)
1 1/2C Shredded Cheddar 
Salt and Pepper to taste


Fill a large pot with water.  Add about a tablespoon of salt.
Bring water to a rolling boil.  Add uncooked pasta.
Give it a stir to make sure they don't stick together or to bottom of the pan.
Set your timer to two minutes LESS than the time stated on pasta bag.
In the meantime, grease your casserole dish. 
Use a butter wrapper to do this, just like Grandma.
Well, not my grandma, but somebody's grandma.
There's plenty there to grease it with, I promise.
 See, greasy!
And don't forget to grate your cheese.  Just however much you want.
I have about a cup and a half here. Wish I had more.
Next, we'll start assembling our ingredients.
I start by putting my diced onion in a large bowl.  I'm only doing a couple of 
tablespoons because my child will be eating this.  I'm not even
sure if he will eat it, but I know he won't find a lot of onions appealing!
Next, drain tuna and flake into bowl
By now, your noodles are getting close to being done.  Give them
a check.  They should be somewhere a bit under al dente.  Drain.
Do not rinse.  Noodles need that starch for sauce to cling to them.
Add to your bowl of goodies.
Mix in about 1/4-1/2C sour cream.  Depends on your taste.
I only had about 1/4C, but darn, I wish I had more. Love it!
 Next, add your cream of mushroom soup.  I made a cream soup base
that I am using here.  Make that on a different day.  Trust me.  This took
me two hours to make all together!  Of course, I was taking pics and stuff!
I'm adding in 1 1/2C (about the size of a can).  I'm not going to add any
milk since mine is hot and seems plenty runny right now.  If you are using
a can. I suggest adding about 1/4C of milk at this point.   And give it a stir.
Mix it together and give it a taste.  Taste good?  Good! 
Need a little salt?  Okay.  But don't add it until after the next step.
Take about 1/2 of your cheese and throw it in.  Ooooh, action shot!
Stir gently.  You don't want to melt the cheese and make it stringy.
You want to have little gooey bits of melted cheese 
here and there in your finished casserole.  See...not melted.
Give it a taste.  Add some salt now if needed.  Remember, you'll
have some more cheese on top that will add to the saltiness.
 Pour the whole thing into your buttered casserole dish.
Did you know?  According to scientific foodie, Alton Brown,
you should only cook a casserole in a dish that is round or oblong.  
Why?  Because he said so!  No, really, it's because the food in the corners of
a square or rectangular dish dry out and get crusty because they cook faster!  
Who knew?!  (Well, I did, but I watch a lot of Food Network)
Sprinkle the rest of your shredded cheese on top evenly.
Cover with foil and slide into a 350F oven. Or in my case, a 350F
toaster oven.  It's really hot today.  I don't want to heat the joint up.
Bake for about 30 minutes.  You can take the foil off at about 25 min
if you like the top nice and crusty.
Idn't it purdy, ya'all!?  Sorry...I was having a Paula Dean moment!
I love tuna casserole.  So creamy, so comforting.
That there is a little slice glob of heaven on a plate to me!
Notes:
This was just what I was hankerin' for!  My son even ate it. Of  course, I called it chicken casserole, lol!  He's never come within 10 feet of something that looks like this, so I was glad he was willing to try.  After he said he loved it, I told him it was tuna, LOL!  He was surprised, but didn't care.  He had seconds and thirds!

I usually use something like rotini or those little corkscrews for this. They tend to let a lot more sauce swim around them.  The macaroni was good, but it seemed to have sucked up a lot of the moisture.

If you've never made your own cream soup base before, I highly recommend it.  Recipe HERE. So easy and tastes like heaven!!!

Feel free to add any veggies you like.  I've just never been a fan of peas in my tuna casserole.  Or potato chips on top, but you can do that too if you like.  I won't judge you (very much).

Maybe the next time you make tuna casserole, you'll think of me. Wait a minute...is that really a good thing?   ;o)

How to dice an onion...

I'm going to show you how I do a small dice on an onion.  Unless I'll be cooking them down,  I always do a small dice.  No one wants to bite into a big hunk of raw onion.  At least I don't.

You know that dirty little root end with the stringy, dry roots?
I cut the dry roots off, just enough so they don't get dirt on my cutting
board with my clean onion.  I got a little aggressive on this one, but I'm
hoping you can see what I mean.  I want the root end in tact enough
that it holds the onion together when I cut.
Cut your onion in half from root to opposite end.
Pull off the outer peel and put in a pile.  Don't throw away.
Save it for stock/broth. You can save the paper peels to
color your hard boiled eggs so you can tell them apart from raw.
Lay one onion half on its side like this
Coming from the side, carefully cut horizontal slits in the onion.
The knife is essentially coming toward your hand, so be careful.
Depending on onion size, I usually make three or four horizontal cuts. 
(to the onion, that is, not my hand)
Now, come from the top and make several cuts going from the root
to the end.  You're not going to cut all the way to the root.  
You're staying about 1/4-1/2" away.
You'll want to start with your knife point going down
so you don't slip and cut yourself.  Fingers out of the way.
Make several slits.  I usually make mine less than 1/4" wide.
Then start cutting through the onion perpendicular to the cuts you just made.
See how my fingers are basically digging into the onion?  This is so the tips
of my fingers aren't anywhere near the blade of the knife.
See?  Nice, (fairly) uniform pieces.  Julia Child would be so proud!
Stop when you get about 1/2" to the end (by the root)
When you get close to the root, you'll have this odd little piece left.
Flop it on its side as shown below.
You could throw that in your stock bag if you want, but I'm going
to show you how to use it to its maximum potential.
Start by dicing up the little part on the rounded side.  
Get as close as you can to the root without being a danger to yourself.
Turn it and get both of those little sides sticking out, again getting
close to the root.  We don't want to waste anything.
Now, I know this is an absolute horrible picture, but I think 
you get the idea of what you'll be left with.
Take that little piece and throw it in a baggie with your other scraps.
Throw it in the freezer and save it for the next time you make stock or broth!
Add in onions peels, carrot ends, celery ends/leaves each time you cut veggies!
Notes:
See, we used the WHOLE onion...no waste.
Okay, maybe those tiny little roots, but what were we gonna do with those anyway? 
Plant them?  Wait a minute....hmmmmmm!  LOL!

Now, I am not claiming I am doing this correctly or that I'm some chef-like momma.  I'm not.  I'm just showing you the way I do it.  While I'm sure it's not technically correct, maybe it will  help you do things a little easier in your kitchen.

When I need just a little bit of onion, I cut up the whole thing anyway, then put in a storage container in the fridge.  The next time I'm cooking, I just grab what I need and throw it in!  Easy peasy, lemon squeezy!

Cream of {anything} Soup

Today I'm going to show you how to make your own Cream Soup Base.  You can turn this into any type of cream soup you want (cream of celery, mushroom, onion, etc...)  Here's what you'll need:


Ingredients:
2T Butter or Fat from homemade broth/stock
2T Onions, optional
2T Flour, heaping
1 1/2C Chicken Broth/Stock
1 1/2C Milk
1/2t Poultry Seasoning
1/4t Onion Powder
1/4t Garlic Powder
1/8t Black Pepper
1/4t Salt (optional.  I omitted)
1/4t Parsley
1/8t Paprika
Helpful Hint: Measure all spices (except salt) out in a little ramekin ahead of time.

I used some fat from the top of some frozen chicken stock.  I scraped
it with a spoon until I got about 2T.  You can just use 2T butter if you want.
Since I didn't want a bunch of fat floating in the soup base, I scraped
the rest off and put it in a container to keep in the freezer for future use.
Plop that in your pan.  I swear, there is nothing like the smell of
the fat from really good homemade stock.  It's so rich and fragrant!
Add in a couple of tablespoons of diced onion.  This is optional.
I just thought it would give a good browned onion taste to it.
Stir until golden brown, about 5 minutes
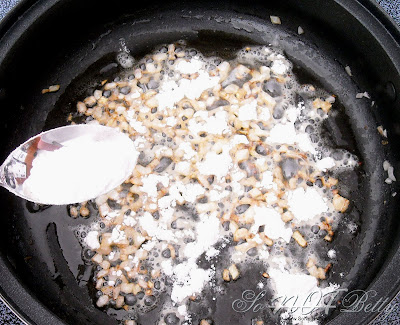
Add in 2 heaping tablespoons flour.  Sprinkle it evenly over the fat.
Mix well.  This is called a roux.  Bad pic, sorry.
Make the mistake of adding another T of flour and end up with
this clump that you have to add some stock to, to thin it out.
You want to basically cook the flour to a golden color.  If you don't
do this, you'll have a real raw flour-y taste that is unappealing.  This
color here is just right.  Some of that is due to the caramelized onions.
Add in your chicken stock a little at a time.   I do this so it doesn't
end up with a bunch of clumps and stock that I have to incorporate.
It will eventually come together, but I find that more difficult.  
This is what your base should look like now.
Bring to a boil, stirring constantly and scraping the bottom of the pan.
At this point, you essentially have chicken gravy!  Save half now if
you think you'll need some gravy tonight!  If not, let's move on...
Since I have a nice smooth texture to my 'gravy', I have no problem
pouring in all of my milk at once.  If it was lumpy, I'd do this in small batches.
It will be thin and watery at this point.  That's okay.  Stir well.
Add your spices (without the salt) to the sauce now.
Stir to incorporate.  Looks like cream soup, huh?!  Give it a taste.
Need some salt?  You can add some now, but I caution you...
sometimes the recipes we use have a lot of salt in other products. 
You can always add some later.  I didn't add any at this time.
Bring to a gentle boil again, scraping pan bottom all the while.
Use what you need now in a recipe, or store some in a baggie.
Label baggies first, then fill and lie down flat in the freezer.
This makes about 3C, which is two soup cans worth.

Notes:
I used this soup base to make some Tuna Casserole last night.  This is the BEST cream of anything soup I've ever tasted!  Especially if you use homemade stock.  There really is no comparison, and it's soooo easy! 

I wanted this soup to be a 'cover all bases' soup, so I didn't add anything like mushrooms or celery to flavor it.  If you wanted to make a cream of 'vegetable' soup, you'd just add your mushrooms/celery/onions/broccoli in at the beginning with the fat and saute a bit.  You may need more fat depending on how many veggies you use.

My estimate for the cost of this whole double batch is 36 1/2 CENTS!  That's 18 cents for a 'can' of soup!
I'm using 10c for a teaspoon of spice, 5c for 1/2t, 2.5c per 1/4t, 1.2c per 1/8t.
While not exact, I think I'm actually on the high side since I buy almost all of my spices for 99c per container.
That just amazes me!  

And it's so much better than the store-bought!  You can control the salt, too.  Store-bought ones are just filled with (way too much) sodium!

Click HERE to learn how to make broth/stock.  
Click HERE to learn how to do a small dice on an onion. 
Click HERE for Tuna Casserole Recipe. 

Recipe courtesy of Tammy's Recipes.