

Showing posts with label Arts and Crafts. Show all posts
Showing posts with label Arts and Crafts. Show all posts
Friday, December 28, 2012
Cute Little Christmas Candy Sleigh
Just a quick little post to show you this adorable little candy sleigh my sister-in-law Jennifer made for all of the kids this year. She found it on Pinterest, of course! Isn't it cute?!
 You can find instructions HERE. I believe it says to use a glue gun but Jennifer used glue dots and glue lines. Then you don't have to worry about melted chocolate or burned fingers! Maybe you'll try this cute little craft yourself next year since I'm a day late and a dollar short!

Friday, November 23, 2012
Ten Minute Temporary Tie-Dye Tee
Say that 10 times fast! The other day was Hippie Day at school and we had no tie-dyed shirt, so we made our own! The total amount of hands-on work time was less than ten minutes.
 Start by gathering your supplies. You will need:
An old t-shirt
Several Stamp Pads
Rubber Bands
Foil or some other thing to protect your work surface
Spray bottle with water.
 Place a few rubber bands around the t-shirt. I decided to do it at regular intervals length-wise rather than all over the place.
 Rub different colors of ink onto each section, all the way around. Now that I think about it, you could use Stampin' UP re-inkers, too. Those probably would have worked better, actually.
 Spritz each section with water generously. We want to wet it so the ink spreads.
 From here you can do one of two things. You can leave it as is, sitting on the counter overnight to dry. It will probably be a little wet where the rubber bands were. Or you can do like I did since I needed it for the next morning and wanted it to be 100% dry and ready to go. And I wasn't about to put that thing in my dryer! I wrapped it in foil and baked it in the toaster oven for a half hour or so at 300 degrees. Make sure the shirt is totally encased in the foil. You don't want to start a fire!
 It didn't get totally dry, but it was dry enough that it didn't drip everywhere when I hung it up. In the morning, it was ready to go. I just left it wrinkly. I think it added to the hippie charm.


An old t-shirt
Several Stamp Pads
Rubber Bands
Foil or some other thing to protect your work surface
Spray bottle with water.


Now, I'm not 100% sure, but because I used Stampin' UP Classic Ink pads, I believe this will be able to be washed out! Hence the word 'temporary' in the title. I haven't tried to wash it yet as I'm waiting to wash it by itself. I don't want to get it mixed up with our regular clothes by accident.
Sunday, August 5, 2012
Upcycled Trash: Cell Phone Holder
My evil, evil friend Mary introduced me to Pinterest a while back. Now I spend entirely too much time there, pinning super unhealthy foods I can't eat and looking up cool crafting ideas. This just happens to be one of them...a lotion bottle turned cell phone holder/charger! The version I saw had the final product mod-podged with some fabric and it was really cute. I left mine plain because it suits my kitchen better, but if i find some fabric I really like, I may change that! Here's what you do (and don't do)...
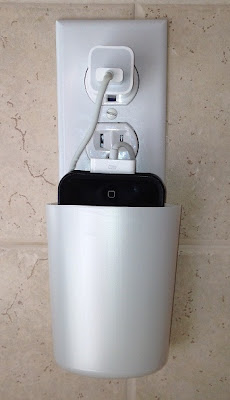 Find an empty lotion/shampoo bottle. Make sure your cell phone can fit down into the bottom. I rinsed mine out well, then ran them through the dishwasher to clean them out.
 This bottle had a removable label, so I chose to use it for this project because it was easier.
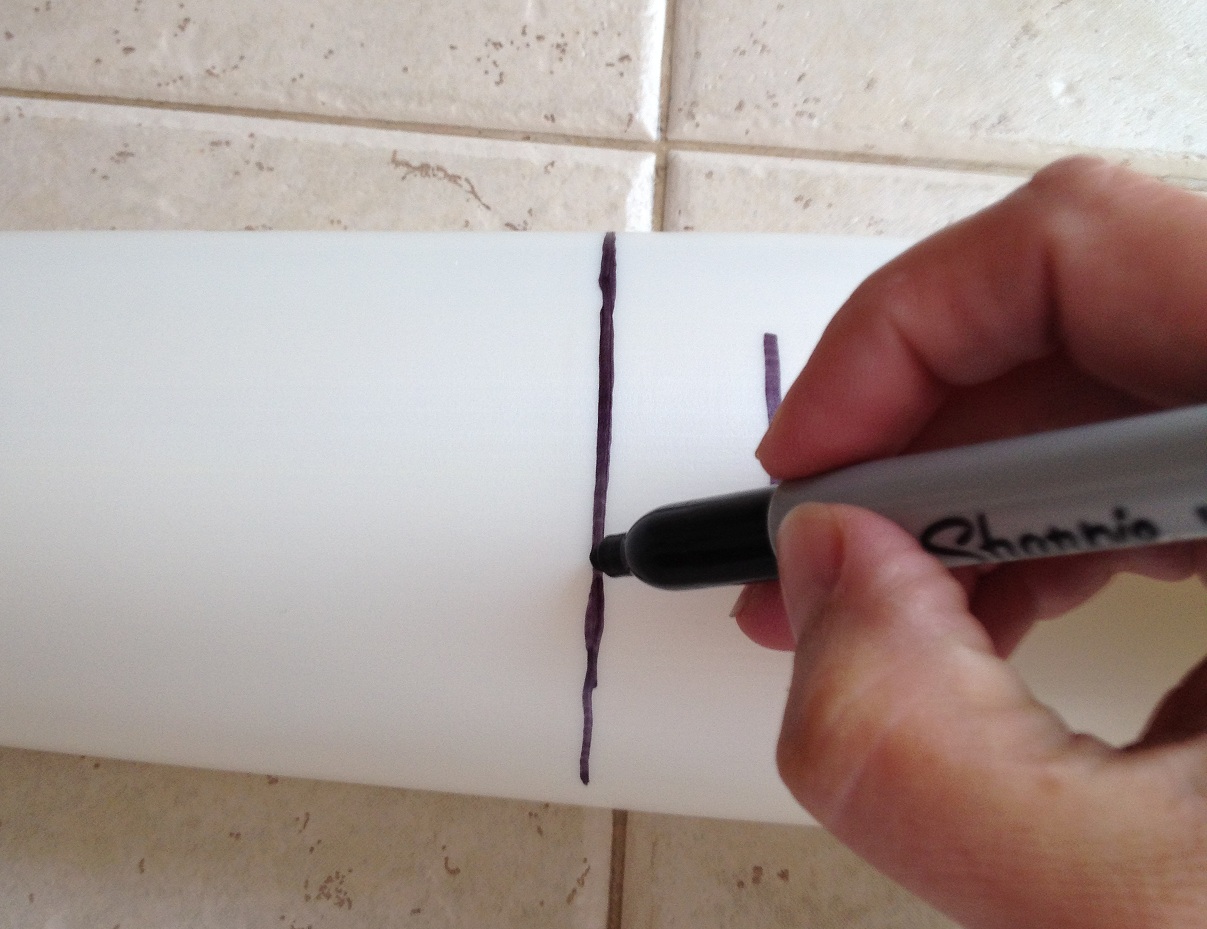
 Draw around your bottle with a Sharpie, creating one side that is lower so you can take your phone out easily and one side that is higher by several inches so you can hang it from the wall socket. I didn't take good enough pictures of that, apparently. Look HERE to see a more in-depth description on how to do this, but please do not cut the hole in the back portion like she did. That poor woman took so much flack for creating a 'fire hazard'. That's why I did mine differently. Please read on.
 You can start to carefully cut along your line with a razor blade, but it's much easier to cut the rest of the way with heavy duty scissors. Trust me on this one.


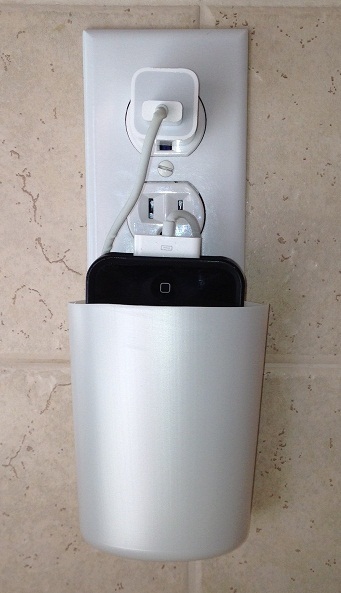



Don't do what I did and cut off a big hunk of the back portion thinking it would be more streamlined. If you look at the very first picture, you will see it is sitting very close to the socket. So close, that it's a little less than simple to get the phone in and out. Had I left it longer, the holder would hang down further and give me plenty of room to put the phone in and out. Sheesh, now that I think of it, maybe I should redo this tutorial entirely! Anyway, lightly sand any rough edges.

Using a screwdriver, take off the switch plate. As a disclaimer, it might be best to turn off the power just in case your hand should slip.

Hold your plastic contraption up to the bottom screw to see how far down you'll need to cut your hole. I decided to do mine this way so there should be no fire or melting hazards involved.

I used my CropAdile to cut a hole toward the top. At this point, you can decorate your holder if desired.

Remove the bottom screw and put it back in through the hole.

Screw the plate back on and you are ready to charge your phone!

This holder goes on a socket that seldom gets used, so it really doesn't bother me that the cord interferes with plugging anything else in. The next time I have a nice bottle, I'm going to try it again with some modifications. It was fun to make and I've been using it every day!
Thursday, June 28, 2012
No-Sew Ruffled Scarf
Isn't this just the cutest? Wanna make one? Heres how...


Anyhow, rather than trash it or turn it into rags, I thought I'd find a way to re-purpose it. Enter Pinterest! I found a tutorial on how to make a ruffled scarf that looked pretty easy. Here's what you'll need:

An XL/XXL t-shirt, the bigger the better. You can steal one of your husband's!
(I found out afterward that jersey-knit would have been a better fabric choice)
(I found out afterward that jersey-knit would have been a better fabric choice)
Dinner sized paper plate Approx 9 1/2 inches
Scissors
Pen
Pins
Fusible Webbing or Fabric Glue (not shown)
Iron (not shown)
Fusible Webbing or Fabric Glue (not shown)
Iron (not shown)
Start by spreading your shirt out on the table. Stand back and be amazed at how huge this shirt really is and admit that you must have been in denial for a lonnnnnng time. Seriously, this thing is almost as wide as the tabletop, yikes! Place the paper plate face-down in an area where you won't run into any seams or logos. We want just plain fabric. You are going to try to get about 4 or 5 sets of circles out of the double thickness, or a total of 8-10 individual circles.

Trace around the plate. Move plate to another free area and continue until you have used up all the free space.

Pin the center of each circle, then cut out. Be sure to cut inside the line so you don't have any ink marks on your finished scarf.

You should have a nice little stack o' circles.

Cut each circle into a coil. Try to keep the strip around 2 inches wide. The example below was only about 1 1/2" and it ended up being wayyyy too long when finished.

This one is a little better. You'll have one little corner that is somewhat squared near where you first started cutting.

Cut that little baby off so it's more rounded.

The inside of your coil should look something like this

After cutting all of your circles, cut off the little pointed tip of each. You just want a straight line.

One video tutorial I watched said to stretch each coil of fabric. This is really hard to do and take a picture of! Stretching makes the fabric curl a little on itself, intensifying the ruffled look. Since mine is a regular cotton t-shirt, I didn't stretch too much or it looked strange and limp.

Lay the strips down, 5 (or 6) going opposite directions. Yes, I realize there are 7 going each direction. I had two shirts, so I used them both. I would have made two scarves, but I screwed up the first couple of coils. I paid no attention to which direction the coils were facing as long as the straight ends were together.

Take some fusible web and put it in between each end.

Fuse together with a hot iron. Do for each set of strips.

Stack all of the strips on top of eachother, meeting at the seam. I staggered them, some facing one way, some facing the other, just for the heck of it. Another tip: I forgot to do this until later, but now is the time to use some more fusible webbing and fuse them all together so your scarf doesn't slip around when you pull on a strip.

Next, we're going to make a little dealy-bop to cover up those seams and to hold our layers together more securely. I just kinda made this part up, so I'm not entirely sure it's necessary. I do kind of like the look of it though. If my sewing machine was working, I might tell you that it could be a good idea to sew this thing on for when you want to wash the scarf. But someone took their sewing machine apart in an attempt to oil it because it was making a gawd-awful screech of death. And then ended up with 3 extra screws and a machine that still squeaks, ah-hem. Stupid, stupid person. Anyyyyyyway, cut yourself a piece of shirt scrap that is about 3" x 8".

Cut a piece of fusible web just shy of 8" long and lay it down along the long side. Fold the edge over to cover. Iron to fuse it shut.

Repeat with other side. It doesn't really matter how wide the piece you end up with is, so don't worry about any measurements.

Now we need to make one of the short sides look a little more finished. Take a small piece fusible web and fold the short end under. Iron.

Lay your stack of fused strips over your newly-fashioned little strip piece. Decide how much you'll need to fold over by wrapping it around a couple of times and adjusting accordingly. Cut off any excess strip from your raw edge if your piece is too long. I know that sounds confusing. The next couple of steps should make it more clear.

Fold the raw edge over and put some strips of webbing on top. I extended the strips to be long enough to fuse the entire finished part I would be folding over. We want our finished end folded over last so it looks nice.

Fold your finished end down over the webbing and fuse together.

Remember earlier when I said THEN would be a good time to fuse each strip together? Well, I forgot that part until now. That's what happens when you're wingin' it! I realized that the strips could slide left and right, which is silly. So, I actually cut the strips of webbing and tucked them in between each strip, then heated to fuse after the fact. Learn from my mistakes, people.

Your scarf is now finished! Try it on and see what you think!
You can wear it just as is, draped over your neck. Hmmm, maybe it is a little thicker than I wanted.
Seems a bit much, no?

Or fold it over itself like you would a 'normal' scarf. What IS that black dot by my neck? No clue! For a minute there, I thought maybe I left a pin in the scarf! Maybe it's dirt on my camera/phone. LOL, I just had
a funny thought! This would make a great Austin Powers get-up for Halloween! Shag-u-lous, baby!

And lastly, you could wear it with a little flower you've plucked from a silk plant in your home (oh, yes, I did!!), or with a little handmade flower pouf clip!

I'm not really a scarf person, but I may become one! I really like the look of this. It really dressed up my plain white shirt! Now that it's done, I realize that this wasn't the best material to use. It did work, but a stretchy, light-weight knit would probably work better, just FYI. I've seen a couple other simple scarves I intend on trying. I'll post those when I get around to them, so stay tuned. Thanks for stopping by! Now, go dig through your husband's skanky old t-shirt drawer!
Friday, June 22, 2012
Frugal wrapping paper and matching cards
Believe it or not, we had THREE birthday parties to attend this weekend! That's about two too many for me, but we decided to let Tommy pick two since they're all his friends. Of course, he picked his future wife, Viktoriya and one of his best buds, Kory. After purchasing the gifts, we decided we would make some wrapping paper and matching cards. Here's how.
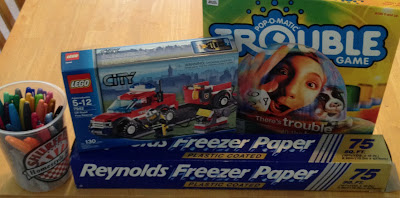 You'll need:
Your gifts, of course
Some freezer paper
Some Sharpies
Optional (Stamp Sets and ink: not shown)
Measure out how much paper you will need for each gift. Either just start drawing or stamp it with permanent ink like we did. Make sure you stamp/draw on the UNshiny side of the paper.
 Then start coloring the images in!

Tommy decided to add in a few of his own drawings to make it extra special.
 Here's what I love about this freezer paper....see the backside? It's waterproof, so the markers don't bleed through. And these are permanent markers. Normally, I'd insist on some extra paper as protection under the project.
 Finish all of your stamping and coloring, then wrap your gifts with it. Be sure to make a matching card while you have your stamps out.
 This quick project really helps to personalize the gifts, but costs just pennies. The kids just love receiving the handmade cards and wrapping paper. Most of the time, the recipient very carefully unwraps the gift so they can save the paper, lol! It cost us next to nothing, but makes a big impression!
Just an FYI: The gift on the left has had a piece of printer paper taped to the game to cover up the words that could be seen underneath. The one on the right does not. Depending on the thickness of your freezer paper and what you'r wrapping, this may or may not be an issue.

Your gifts, of course
Some freezer paper
Some Sharpies
Optional (Stamp Sets and ink: not shown)
Measure out how much paper you will need for each gift. Either just start drawing or stamp it with permanent ink like we did. Make sure you stamp/draw on the UNshiny side of the paper.


Tommy decided to add in a few of his own drawings to make it extra special.


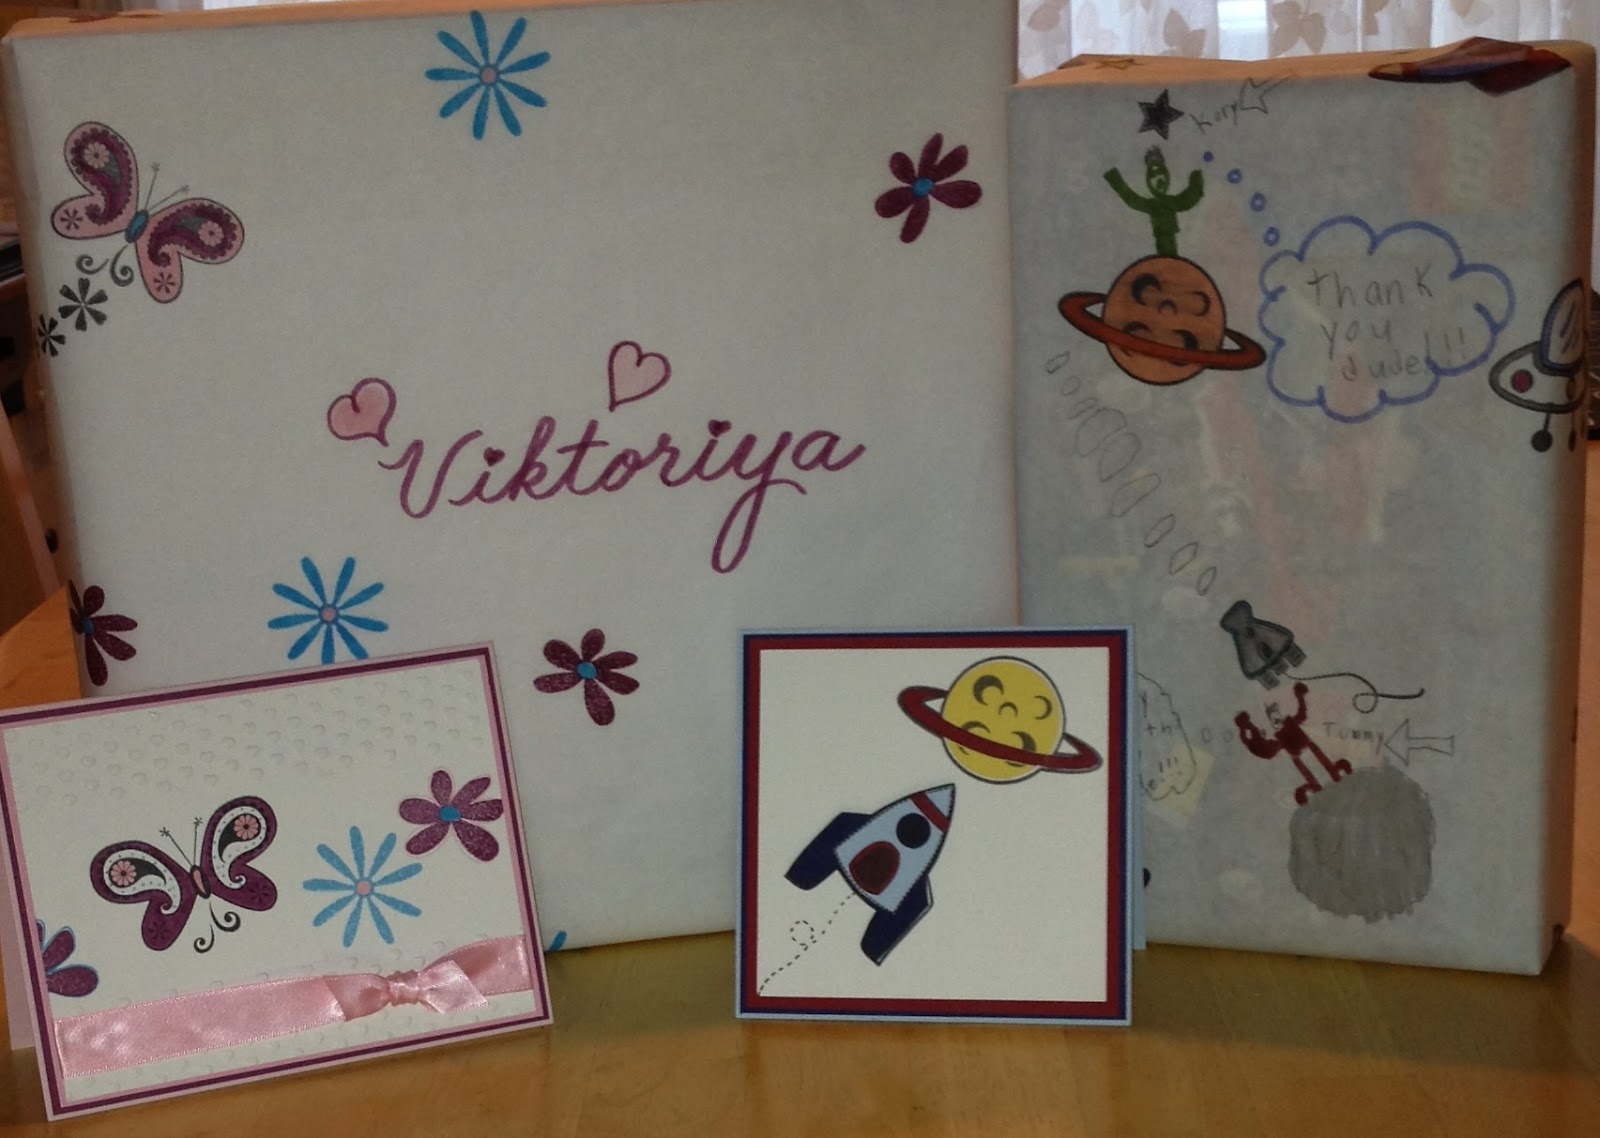
Just an FYI: The gift on the left has had a piece of printer paper taped to the game to cover up the words that could be seen underneath. The one on the right does not. Depending on the thickness of your freezer paper and what you'r wrapping, this may or may not be an issue.
Subscribe to:
Posts (Atom)


