Showing posts with label Dessert. Show all posts

Thursday, December 27, 2012

Christmas Cookies

I hope you all had a great Christmas!  Ours was really good!  We had several places to go but we had a lot of fun!  That was refreshing since I've had a case of the bah-humbugs this year!  I did manage to whip out a few batches of cookies though.  This year, I made three entirely new recipes just for the heck of it.  Rather than show you step by step, I'll just give you links to the recipes below.

Back Row: Caramel (Pecan) Cookies, some without pecans (hubby won't eat them) The ones with the pecans were the BOMB!!!)  Recipe here:  http://www.savoryreviews.com/2012/04/19/caramel-pecan-cookies/

Middle Row: Funfetti Cake Mix Cookies

Front Row: Chewy Sugar Cookies dipped in different sugars/nonpareils

I hadn't been feeling well for the few days prior to Christmas, so I didn't make a ton of cookies this year. However, I would definitely make ALL of these again.  I loved loved loved the texture of the sugar and funfetti cookies.  They were really thin and crisp, yet chewy.  Totally addictive! I made a double batch of the funfetti ones and my husband wanted to keep them all for himself and not take them to anyone's house!  Greedy little bugger!

I hope you all had a wonderful Christmas and didn't eat too much for a week straight (thus ruining your diet) like I did!

Friday, November 23, 2012

Three Musketeers Bars

That's right!  Three Musketeer bars, at home!  First, let me tell you that I did NOT use the correct ingredients for this recipe at all, but they still came out fine.  They were not light and fluffy like Three Musketeers, which I personally enjoyed, and they tasted really good!  See, I was going off of memory when I was at the store...ha ha ha.  I should know better.

The original recipe calls for Cool Whip, but my brain was thinking Marshmallow Fluff!  Since that's what I mistakenly used, that's what I use for describing this recipe.  I also changed it half way through by adding in some marshmallows (because I used the small jar of fluff) and Malt Powder, which really tasted good.  If you want the original recipe that is probably much easier and doesn't involve my screw ups, you can click here. All of these changes are really starting to make me wonder why I'm even posting this, lol!
Here's what you'll need for my version:
2C Semi Sweet Chocolate Chips
2C Milk Chocolate Chips
Marshmallow Fluff (Mine was 7oz, but should have gotten a bigger one)
2T Malted Milk Powder
Couple handfuls of mini marshmallows (not shown)

Start by melting your semi sweet chocolate chips in the microwave. Stir every 30 seconds.
Stir in the entire jar of marshmallow fluff.
Hmmmm, not bad.  It was still pretty dense though.  Kind of stringy in a creepy way.
So, that's when I decided to add a couple of handfuls of mini marshmallows.
Using the mixer, I didn't even have to heat things up to get them to mix in.
I tasted it at this point and decided it just needed....something.  That something was malt powder!  I threw in a couple of tablespoons full.
Then I mixed that baby up and spread it in a parchment-lined 8 x 8 pan.
Now, here's where I totally screwed up.  I threw the whole thing in the freezer thinking they'd firm up well and cut into perfect little squares.  What really happened was that it came out something akin to petrified wood and I had to place a huge knife on the top, then whack it with a meat mallet just to get through the stuff!  Note: cool in fridge....do not freeze.
Heat up your milk chocolate in the microwave until melted.  Dip in your squares one by one.
Set on parchment until set.  You can also throw them in the fridge for a bit.
Once set, you can store then in a container with a lid.  I kept mine in the fridge because it was hot out when I made these.  Yes, it's been a while since I've posted anything.
In the fridge, they are still quite chewy, but very tasty.  They do soften up quite a bit when left at room temp though.  I'd liken the texture to a Tootsie Roll.  Not quite fluffy like the real deal, but in all honesty, that's what I've never liked about the real ones...the fluffy-ness.  Me no likey.
Of course, my taste-tester thought they were 'totally awesome'!  This is the face he made when I asked him 'to make a CUTE, smiling face while taking a bite'.  In retrospect, that might have been too many instructions at one time for a seven year old boy.
So, I tried one more time, this time instructing him to act like he was at least enjoying it.  Apparently, there is a fine line between enjoying it and about to get run over by a Mack truck.  I give up, LOL!  Little poop!

Cinnamon Sugar Pretzels

Here's another little recipe I found on Pinterest.  You can find the (hopefully) original author here although I changed it a little.  These were quick and easy and pretty tasty.  Here's what you'll need:
1/2-2/3 Bag Pretzels (yes, mine is opened on the wrong end, lol)
1 Stick Butter
1/2C Sugar
2t Cinnamon

Start by throwing the butter, sugar and cinnamon into a bowl.  Microwave until butter melts.
Throw in pretzels and stir to coat.  I found that a little more than 1/2 bag was enough.  I tend to like lots of coating though.  You may find you like less.
Pour onto a foil-covered baking sheet and bake at 300 for 30 minutes.  Stir every 10 min.
Let cool completely and store in a baggie or other container at room temperature.

Notes:
These were quick and easy and tasted pretty decent.  These would be an inexpensive little filler for a Christmas tray.  Since I'm a big lover of all things caramelized, I'm thinking these would be even tastier if you cooked the liquid until hard crack stage, then coated the pretzels and baked.  Anything that resembles caramel corn appeals to my fat side.  If I make these again, I'll try that and let you know how it turned out.

Fried Cheese Sticks

I keep forgetting to take pix of my ingredients. Sorry about that!  Well, these are so simple, you can remember the list.  All that is needed is:

Egg Roll Wrappers
Mozzarella Cheese Sticks
Oil for frying
Marinara, if desired

Start by wrapping a cheese stick up in an egg roll wrapper.  Start at the bottom corner and roll half way up.  Fold in the sides, then continue wrapping the rest of the way. Wet the edges to seal.
Heat your oil up in a pan. I just kept it shallow, but really should have gone a little deeper with it.  As you can see in the next pic, the cheese didn't quite get melty enough.
Turn every minute or so until they are browned on all sides.  Drain on paper towels.  Serve up with some marinara.
I decided to make a little treat with some of the leftover wrappers by cutting them up and frying them.  I sprinkled some with powdered sugar and some with cinnamon/sugar.
Notes:
1) Use at least 1" grease or your cheese won't melt properly.
2) If I made these again, I'd use Lumpia wrappers.  They are thinner and crispier.  These didn't get cooked all the way through and were kind of gummy/chewy/flour-y.  My hubby and my son loved them anyway.  

Friday, September 7, 2012

Easy, healthy homemade ice cream

When attempting to eliminate refined sugars from your diet, it can be somewhat limiting when you want something sweet, especially if what you want is ice cream!!!  I'm sure I didn't invent this, but when I have a hankering for ice cream, I make the following:
What you'll need per serving:
1C Frozen Raspberries or Strawberries (NO SUGAR added)
1/3-1/2C Heavy Whipping Cream
Stevia or Raw Honey
REAL Sea Salt
Start by adding your frozen berries to a bowl with sprinkle with salt.
Add either a teaspoon of raw honey up to 12 drops of liquid Stevia.  Different brands may take more or less.  Remember, when adding Stevia, start small and work your way up.  Things can go from pleasantly sweet to acky and bitter in a flash.
Pour over your cream.  Start with about 1/3 cup.  You can always add more later if it's not enough for your liking.  I like a lot, so I probably added a good 1/2 cup.
Give it all a good stir with your fork, then smash the berries as you go.  This will take just a minute or so.  That's it!  You're done in less time than it would take to scoop out a serving of the store-bought stuff!
I took a little longer than expected with my picture-taking and transferring to a fancy glass, so mine looks a little runny.  But when you're done, it's actually quite reminiscent of the REAL stuff if you ignore the seeds.  I actually like that because it reminds me that I'm eating something real and healthy.
I LOVE this stuff.  I could eat it every night.  The heavy cream gives it such a luscious and almost buttery mouth feel that is to die for!  Just as a test, I tried a teeny tiny bite of the commercial stuff the other day.  Because I haven't really had anything with chemicals in it for so long, I wasn't surprised to find that it tasted HORRIBLE to me. All I could taste was chemicals. Until you eat real food for a while, your tongue can't seem to differentiate between real food and chemicals.  Once you've been 're-sensitized' again, it's kinda shocking how strange things taste.  I hope you'll give this a try sometime and let me know what you think.  It's a "real' treat!

Saturday, August 18, 2012

Healthy Homemade Almond Joy Bars

Do you like Almond Joy candy bars?  I sure do!  But I don't like the icky ingredients in the store-bought ones. Since corn syrup is the first ingredient in them, I decided to make my own using healthy, natural ingredients.  Ready?  Here's what you'll need:
1C Extra Virgin Coconut Oil
2 1/2C UNsweetened Coconut Flakes*
Almonds
1C RAW Honey, melted (not the honey bear kind)
1 1/2C Unsweetened Cocoa Powder (I highly recommend Ghirardelli...Hershey is kinda bitter)
1T Vanilla
Pinch of Sea Salt

Toss everything but almonds into a bowl and mix together.

Line a cupcake tin with 12 paper liners.  Looking back, I wish I had a mini muffin tin and liners because these are entirely too big.  I would imagine you could easily get 48 minis out of this batch.  Put desired amount of almonds in the bottom of each paper cup.  I used 6 per cup and put one on top later.
If using the same size tins I did, you can put 1/4C of the mixture in each paper cup and use it all up exactly as this makes about 3 cups.  You may need to stir in between additions because the coconut oil and honey tend to separate a tad from the coconut.
I decided it needed a little sprinkle of salt on top, too.  I'm glad I did.  It was a nice contrast.
I then put a single almond on top of each and threw the whole pan in the fridge to set.  As a side note, these should be kept in the fridge or they will get really melty and gooey because of the coconut oil.
Once they are set, dig in!  Because these have coconut oil in them, they are actually quite filling/satisfying, so a little goes a long way.   I try to restrain myself to only eat 1/2 to 1 per day.  Sometimes I'm really bad and eat two, tee hee hee.  But that's over the course of an entire day.  If you are not used to eating coconut oil, you need to start out slowly and work your way up or it may cause some major tummy trouble.  Not because it's bad, but because your body isn't used to the good stuff in it.
They were really yummy! I noticed the outside edge was a little bitter, while the inside was sweet and chewy from the honey.  Maybe that happened because I didn't melt my honey first.  I didn't mind at all.  These are not sicky sweet at all.  If you like things really sweet, you could always use some more honey.

If you cannot bear to have your 'almond joy' mixed together like this, I do have a solution for you, well, sorta.  You could always mix the coconut oil, honey, vanilla, coconut flakes and salt together, then pour into molds.  (As a side note, I have not done this, so the coconut oil and honey amounts may need tweaking)  For the chocolate, you'd probably have to melt 1 1/2C chocolate chips with a couple of tablespoons of coconut oil, then pour on top. Then add your almonds on top.  Or heck, go wild and sandwich them in between.  The reason I didn't do it that way was because I was trying to avoid processed sugar altogether.   *As for the coconut flakes, if you can't find unsweetened, you could probably use the normal kind with sugar, but then again, you'll have to adjust for that extra sweetness.  I bought my raw, unsweetened flakes at Tropical Traditions online.  They also sell coconut oil, but VitaCost is usually cheaper.

While these are not low-cal by any means, it is important to remember that not all calories are created equal, not by a long shot.  Let's talk about sweeteners, shall we?  The effects 1oz of HFCS (glycemic index of 87) has on your blood sugar is clearly worse than 1oz of raw honey (glycemic index of 35).  So, raw honey is the 'natural' choice, pun intended.  Raw honey also gives a nice chewy texture that I just love.  It's also good for your allergies!  Just make sure it's RAW, not the honey bear kind.  That kind doesn't work as it won't set up and you'll be left with a gooey mess.  Not to mention it has a higher glycemic index than raw honey.  See what happens when humans mess with mother nature?!  It's never good.  (unless you're talkin' about chocolate!)  Anyway, I get my honey at VitaCost, which has the best prices anywhere for healthy ingredients/vitamins.  If you want to get $10 off your order, contact me and I'll send you a referral link.  We can both save $10 that way....win/win!

Now on to the fats.  Some people believe fat is fat is fat.  Not true. Sure, it all has about 100-120 cals per tablespoon.  Let's say you were thinking of using canola oil instead of coconut oil, in any recipe.  Neither has any carbs...good deal.   So you might say..well, what's the difference then?  Well, aside from the fact that canola oil will not set up in this particular recipe like the coconut oil will, I will go on a small hater of all things canola oil rant if I may.  Canola oil is rancid rapeseed oil that was originally developed to fatten cattle (depending on who you ask), except the cattle developed metabolic disorders, cancer, depressed immune systems and cysts.  When the canola oil was discontinued, the cysts went away, but scarring remained.  So canola manufacturers said, hey! Let's bleach, refine and deodorize it using harmful chemicals similar to fuel oil, and shove it down unsuspecting Americans' throats, touting it as the 'healthiest' of vegetable oils out there.....yeahhhhh, right.

Canola started in Canada where rapeseed is the #3 crop, after wheat and barley.  The Canadian govt paid the US $50 million dollars to certify it as GRAS (Generally Recognized As Safe). Hmmmm, in my world, that would be called bribery.  Because RAPEseed oil sounds horrifying, they came up with Canola, which is short for Canadian Oil, Low Acid.  Nope, there is no canola plant.  Makes me wonder if anyone in Canada eats the crap.  They're probably laughing their way to the bank, sitting back and watching all of the fat Americans get sicker and sicker.  Sad, really.  Interesting little tidbit...one of the reasons it's grown so prolifically in Canada is that it's such a hardy crop.  Why so easy to grow?  Well, bugs won't even eat the plants!!!  That should tell us something!! A little not-so-light reading here by someone who knows a heckuva lot more about it than I do.  I will never touch the stuff again.  Hope I don't get sued like Oprah.  Good thing I'm broke.

Now, on to wonderful, beautiful, natural extra virgin coconut oil... According to Natural News, the healthy fat in coconut oil plays an essential role in regulating blood sugar: it slows the digestive process to ensure a steady, even stream of energy from your food by lowering the overall glycemic index of your meal. When you include coconut oil in a meal with carbohydrates, the carbs are broken down into glucose more slowly, so blood sugar levels remain steady even after you eat.  Take THAT canola!!!!  

See how important it is to choose healthy ingredients?....even when making a potentially unhealthy dessert, lol!  If you make these, please let me know what you thought of them!

Monday, August 6, 2012

Homemade Yellow Cake "Mix" and Fudge Frosting

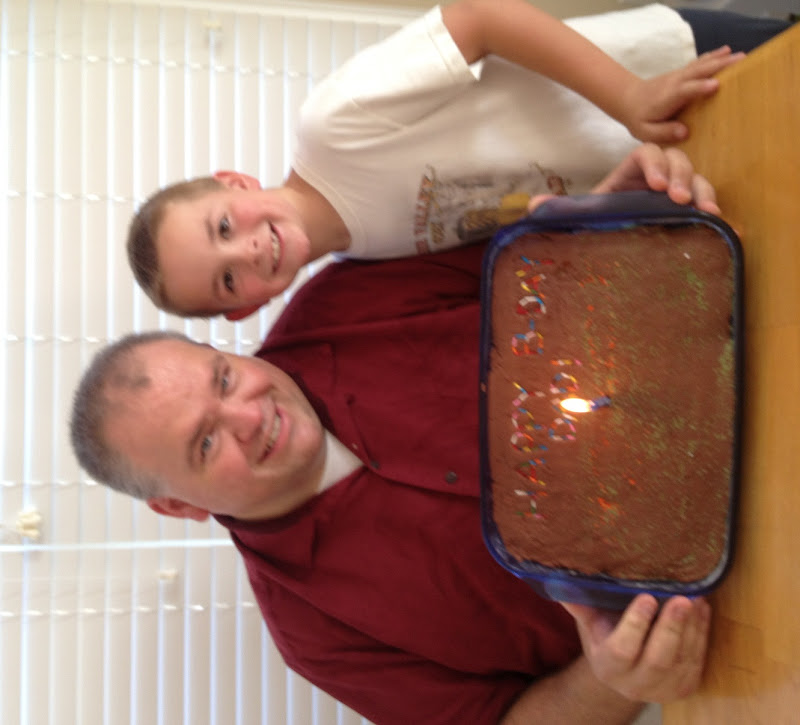
This year, my husband's birthday fell on a day he was out of town.  Wanting to surprise him when he came home, Tommy and I baked a cake for him.  And by Tommy baking a cake with me, I mean he helped put on the sprinkles.  A dedicated sous-chef, that boy!

I knew I wanted to make the cake from scratch in order for it to be cheaper and chemical-free.  So, to the internet I went.  I found this recipe on Pinterest....where else? The original recipe called for powdered milk, but I didn't have any, so I used powdered buttermilk.  Turns out it was a happy accident because my hubby said this tasted just like his grandma's "Nana Cake".  It actually brought tears to his eyes.  (In a good way...I hope)

Here's what you'll need to make a mix:
1 1/2C Sugar
2C Flour
1T Baking Powder
1/2C Buttermilk Powder or Powdered Milk

Mix all ingredients together and pour into a gallon zip-top bag.  This will keep in the pantry for 6 months.  I put mine in the freezer, so I'm assuming it will last a good year.  I jotted down the rest of the ingredients and instructions on the bag.
To make the actual cake once you're ready, simply empty the mix into a bowl and add 1 stick of softened butter, 3/4C water, 1t vanilla and 3 eggs. (In case you couldn't read that on the bag above)
Mix on medium for two minutes. BTW, if you use buttermilk powder and you taste the batter, it will not taste very good like the fake, store-bought stuff with tons of additives does.  Don't worry, the end result is yummy.
Pour into a buttered and floured pan and bake at 350 for about 30 min.  I know it says 35-40 on the bag above, but I found it to be done in 30.  The recipe said to not over-bake or it will be dry.
While that's a-bakin', you can prepare the fudge frosting, also found through Pinterest.  You will need:
1 Stick room-temp butter
1/2C Unsweetened Cocoa Powder
5C Powdered Sugar
1t Vanilla Extract
1/3C+ Boiling Water

  Dump the cocoa and powdered sugar in a bowl and stir to combine.
Add in your boiling water, extract and butter.
Mix well.  You may need to add some more water if your icing is too thick.
Mine was super thick and needed more water, but I (stupidly) thought mine would melt onto the hot cake when I plopped it on.  It didn't.  I thought I was being resourceful (some might say lazy), thinking it would keep some moisture in the cake since Daddy didn't come home until the next day.  Live and learn, lady!
Even after spreading it around, it was super thick, like fudge.  I guess that's why they call it fudge frosting!!!  It's not the prettiest thing in the world if you leave it thick, lol!  Good thing my husband loves a good, thick slab o' frosting.  Seriously, this was about 3/4" thick!!!  Too much for my taste.
Afterward, let your child lick the spatula, instructing him to make a cute/happy face while doing so.  End up with this drooling goon face instead.  Good thing his momma thinks he's cute!  With his hoot-owl hair, puppy dawg eyes and Sponge-Bob teeth!  I love him, hee hee hee!
Decorate as desired.  Or, in our case, spell out Happy B-Day Dad in jimmies and sprinkle with colored sugar, lol!  As you can see, my husband is a large man, but I juuuusssst noticed how HUGE his hands are!!!
My husband was soooooo happy with this cake!  He said it reminded him of the cake his Nana used to make just for him on his birthday.  I'm happy I could bring back that memory for him and that he truly enjoyed it.  It cost next to nothing to make and took just minutes to throw together.   It took a lot less effort than dragging my butt to the store and didn't have all the creepy chemicals like the boxed ones do.  That makes me happy!  Sheesh, after all of that, I forgot to take a picture of a slice!