

Friday, December 28, 2012
Cute Little Christmas Candy Sleigh
Just a quick little post to show you this adorable little candy sleigh my sister-in-law Jennifer made for all of the kids this year. She found it on Pinterest, of course! Isn't it cute?!
 You can find instructions HERE. I believe it says to use a glue gun but Jennifer used glue dots and glue lines. Then you don't have to worry about melted chocolate or burned fingers! Maybe you'll try this cute little craft yourself next year since I'm a day late and a dollar short!
"Real" American Cheese
I haven't purchased American cheese for over a year now. Why? Because it's not 'real' cheese! It's nothing more than a bunch of oil and chemicals. Seriously, don't buy it. It has always tasted like plastic to me, especially the individually wrapped slices. Those are sooooo gross. On a quest to find a better alternative, I found this recipe and decided to make it for my son who misses American cheese. It was a hit! It really tastes like American, but without the plasticy aftertaste. The recipe below makes 2/3 of a batch since I only had 1# of cheese on hand.
You'll need the following:
8oz Cheddar Cheese
8oz Jack or Mozzarella Cheese
1C + 2T Powdered Milk (I used powdered buttermilk because I didn't have the regular powdered milk)
1t Gelatin Powder (Unflavored)
1C HOT water
A Pan lined with plastic wrap or parchment
A Blender
 Shred both of your cheeses.
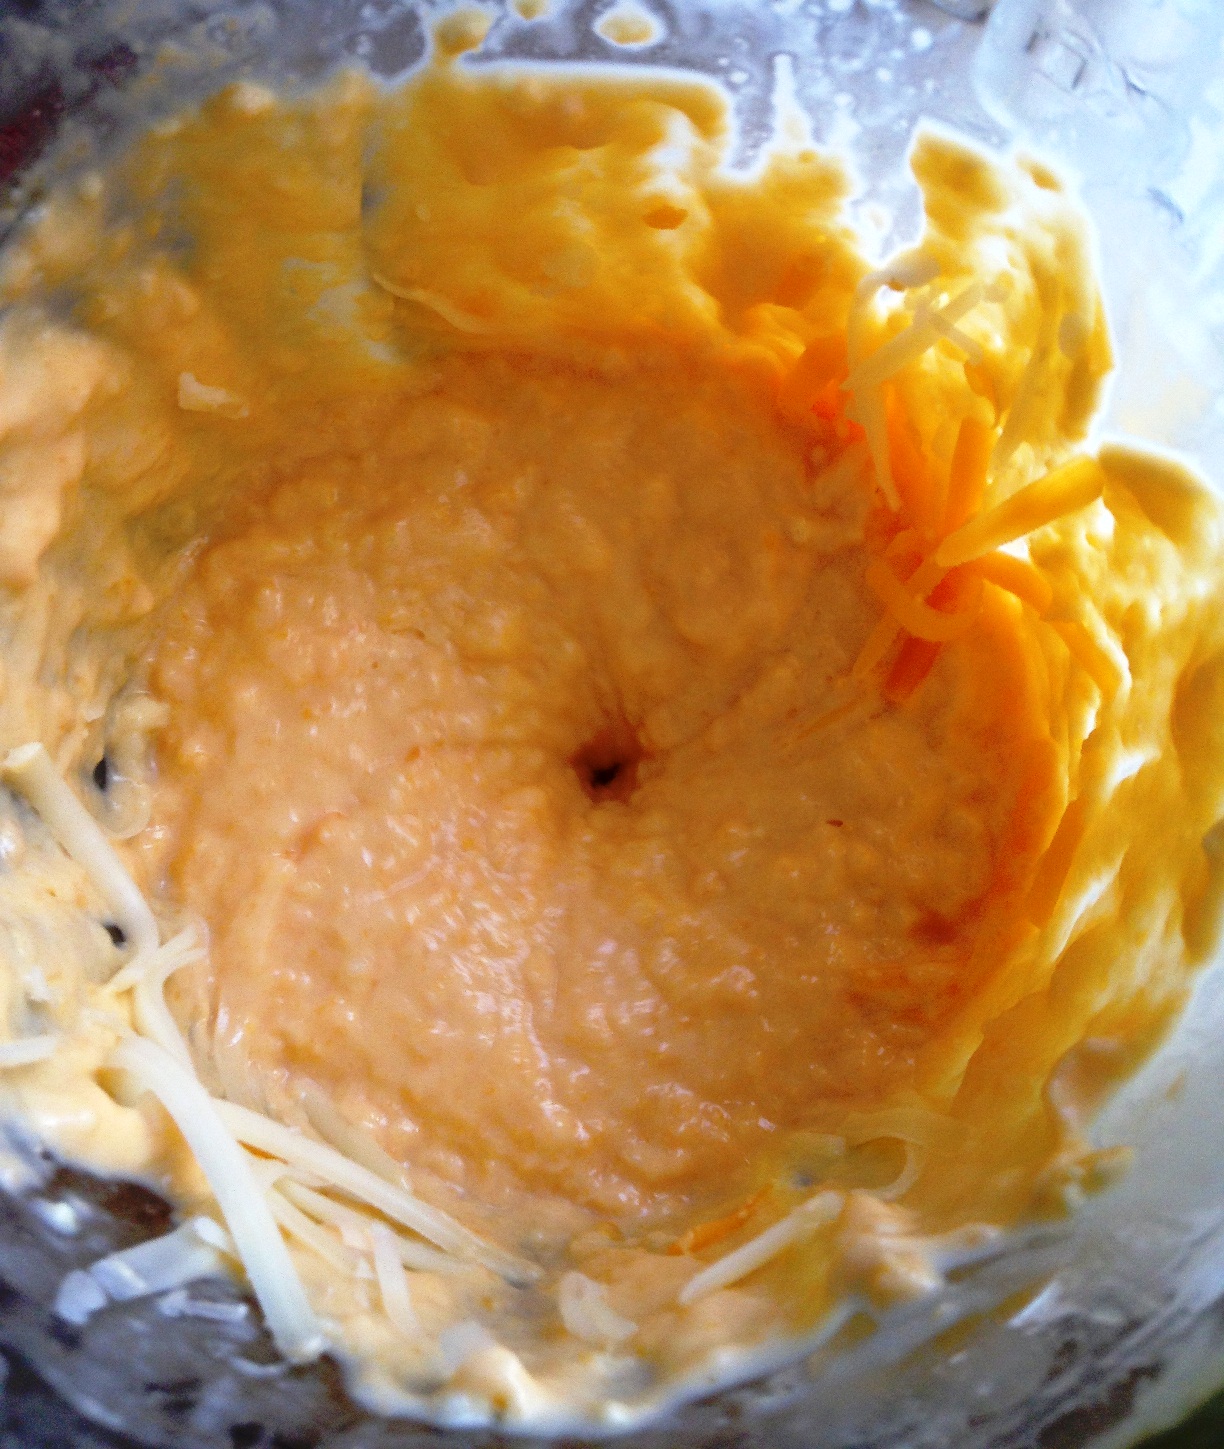
 Toss the hot water and gelatin into the blender and give it a whirl. Guess I forgot to take a pic of that. Then throw in your cheese and your powdered milk. Use the liquefy setting and let it run until smooth. If making a whole batch as shown on the link above, you'll probably have to do it in two batches. I found that I can easily do this 2/3 of a batch in one fell swoop. You'll need to scrape down the sides at least one time.
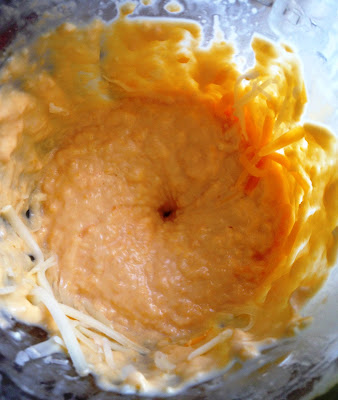 Smear it all into the plastic wrap-lined pan and cover the top with more plastic. Throw it in the fridge overnight.
 The next day, turn it over and slice! I found that it was a little more spreadable than it was 'cuttable'. Next time, I might add some more gelatin. As a disclaimer, it could have been the fact that I used buttermilk powder, not really sure. I kind of liked that it was spreadable, actually. I used it for all sorts of things. We spread it on crackers, made grilled cheese sandwiches. It would be great in some mac and cheese. If you want it more slice-able, I would probably double the gelatin.
 Does it melt? You bet!! Almost TOO melty! Very American cheese-like!
 Tommy gave it a big thumbs up! That's all I needed to see! I will definitely be making this frequently! It's so easy and MUCH cheaper than those "American" Slices!

You'll need the following:
8oz Cheddar Cheese
8oz Jack or Mozzarella Cheese
1C + 2T Powdered Milk (I used powdered buttermilk because I didn't have the regular powdered milk)
1t Gelatin Powder (Unflavored)
1C HOT water
A Pan lined with plastic wrap or parchment
A Blender


Thursday, December 27, 2012
The Littlest Black Belt
I just have to take a minute to brag about my little guy and hope I don't sound like a butthead. My son Tommy, who is only 7, earned his 1st Degree Black Belt in Tae Kwon Do on December 15th. He's one of the youngest black belts ever in our ATA school and I couldn't be more proud! If you could have seen him when he started, you wouldn't even believe it was the same child. Let's just put it this way...they couldn't even keep him out on the mats for the first few days. Master K (7th degree Black Belt....that's HUGE!) sent the entire class to chase him down and bring him back. When that didn't work, Tommy was benched for the entire next week because he couldn't follow instructions! Tommy started TKD a few days after turning 3 and (thankfully) really enjoys it a lot now! I give a lot of credit to Kassebaum's ATA Academy. Master K really has a good way with the kids and his assistants, Mrs. Hedenskog and Mrs. Glassburner are outstanding! If you know anyone who is interested in joining TKD, I highly recommend ATA. They have locations all over the US. No, I don't work for them, but I sure think they're great! Here's my little guy, Master K and they board he broke at testing (signed by instructors). If you look closely, you can see Tommy's black belt has been embroidered with his last name. So exciting for him!
 And here's a proud mama tying her baby's black belt (incorrectly I found out later) and giving her baby boy a huggy hug.


Christmas Cookies
I hope you all had a great Christmas! Ours was really good! We had several places to go but we had a lot of fun! That was refreshing since I've had a case of the bah-humbugs this year! I did manage to whip out a few batches of cookies though. This year, I made three entirely new recipes just for the heck of it. Rather than show you step by step, I'll just give you links to the recipes below.


Back Row: Caramel (Pecan) Cookies, some without pecans (hubby won't eat them) The ones with the pecans were the BOMB!!!) Recipe here: http://www.savoryreviews.com/2012/04/19/caramel-pecan-cookies/
Middle Row: Funfetti Cake Mix Cookies
Front Row: Chewy Sugar Cookies dipped in different sugars/nonpareils
Recipe here: http://trickschefs.com/showthread.php?tid=1108
I hadn't been feeling well for the few days prior to Christmas, so I didn't make a ton of cookies this year. However, I would definitely make ALL of these again. I loved loved loved the texture of the sugar and funfetti cookies. They were really thin and crisp, yet chewy. Totally addictive! I made a double batch of the funfetti ones and my husband wanted to keep them all for himself and not take them to anyone's house! Greedy little bugger!
I hope you all had a wonderful Christmas and didn't eat too much for a week straight (thus ruining your diet) like I did!
Friday, November 23, 2012
Ten Minute Temporary Tie-Dye Tee
Say that 10 times fast! The other day was Hippie Day at school and we had no tie-dyed shirt, so we made our own! The total amount of hands-on work time was less than ten minutes.
 Start by gathering your supplies. You will need:
An old t-shirt
Several Stamp Pads
Rubber Bands
Foil or some other thing to protect your work surface
Spray bottle with water.
 Place a few rubber bands around the t-shirt. I decided to do it at regular intervals length-wise rather than all over the place.
 Rub different colors of ink onto each section, all the way around. Now that I think about it, you could use Stampin' UP re-inkers, too. Those probably would have worked better, actually.
 Spritz each section with water generously. We want to wet it so the ink spreads.
 From here you can do one of two things. You can leave it as is, sitting on the counter overnight to dry. It will probably be a little wet where the rubber bands were. Or you can do like I did since I needed it for the next morning and wanted it to be 100% dry and ready to go. And I wasn't about to put that thing in my dryer! I wrapped it in foil and baked it in the toaster oven for a half hour or so at 300 degrees. Make sure the shirt is totally encased in the foil. You don't want to start a fire!
 It didn't get totally dry, but it was dry enough that it didn't drip everywhere when I hung it up. In the morning, it was ready to go. I just left it wrinkly. I think it added to the hippie charm.


An old t-shirt
Several Stamp Pads
Rubber Bands
Foil or some other thing to protect your work surface
Spray bottle with water.


Now, I'm not 100% sure, but because I used Stampin' UP Classic Ink pads, I believe this will be able to be washed out! Hence the word 'temporary' in the title. I haven't tried to wash it yet as I'm waiting to wash it by itself. I don't want to get it mixed up with our regular clothes by accident.
Three Musketeers Bars
That's right! Three Musketeer bars, at home! First, let me tell you that I did NOT use the correct ingredients for this recipe at all, but they still came out fine. They were not light and fluffy like Three Musketeers, which I personally enjoyed, and they tasted really good! See, I was going off of memory when I was at the store...ha ha ha. I should know better.
The original recipe calls for Cool Whip, but my brain was thinking Marshmallow Fluff! Since that's what I mistakenly used, that's what I use for describing this recipe. I also changed it half way through by adding in some marshmallows (because I used the small jar of fluff) and Malt Powder, which really tasted good. If you want the original recipe that is probably much easier and doesn't involve my screw ups, you can click here. All of these changes are really starting to make me wonder why I'm even posting this, lol!
 Here's what you'll need for my version:
 2C Semi Sweet Chocolate Chips
2C Milk Chocolate Chips
Marshmallow Fluff (Mine was 7oz, but should have gotten a bigger one)
2T Malted Milk Powder
Couple handfuls of mini marshmallows (not shown)
Start by melting your semi sweet chocolate chips in the microwave. Stir every 30 seconds.
 Stir in the entire jar of marshmallow fluff.
 Hmmmm, not bad. It was still pretty dense though. Kind of stringy in a creepy way.
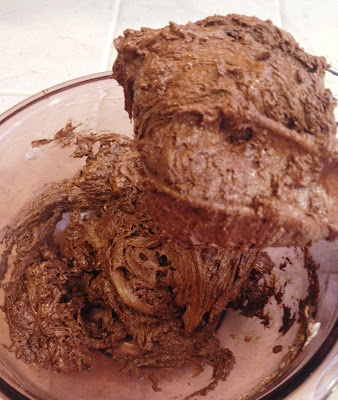 So, that's when I decided to add a couple of handfuls of mini marshmallows.
 Using the mixer, I didn't even have to heat things up to get them to mix in.
 I tasted it at this point and decided it just needed....something. That something was malt powder! I threw in a couple of tablespoons full.
 Then I mixed that baby up and spread it in a parchment-lined 8 x 8 pan.
 Now, here's where I totally screwed up. I threw the whole thing in the freezer thinking they'd firm up well and cut into perfect little squares. What really happened was that it came out something akin to petrified wood and I had to place a huge knife on the top, then whack it with a meat mallet just to get through the stuff! Note: cool in fridge....do not freeze.
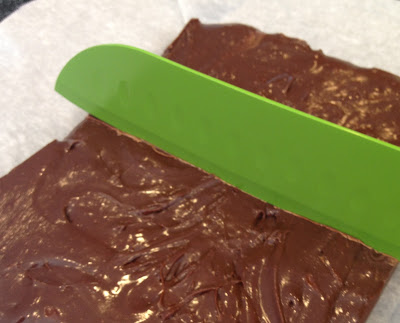 Heat up your milk chocolate in the microwave until melted. Dip in your squares one by one.
 Set on parchment until set. You can also throw them in the fridge for a bit.
 Once set, you can store then in a container with a lid. I kept mine in the fridge because it was hot out when I made these. Yes, it's been a while since I've posted anything.
 In the fridge, they are still quite chewy, but very tasty. They do soften up quite a bit when left at room temp though. I'd liken the texture to a Tootsie Roll. Not quite fluffy like the real deal, but in all honesty, that's what I've never liked about the real ones...the fluffy-ness. Me no likey.
 Of course, my taste-tester thought they were 'totally awesome'! This is the face he made when I asked him 'to make a CUTE, smiling face while taking a bite'. In retrospect, that might have been too many instructions at one time for a seven year old boy.
 So, I tried one more time, this time instructing him to act like he was at least enjoying it. Apparently, there is a fine line between enjoying it and about to get run over by a Mack truck. I give up, LOL! Little poop!

The original recipe calls for Cool Whip, but my brain was thinking Marshmallow Fluff! Since that's what I mistakenly used, that's what I use for describing this recipe. I also changed it half way through by adding in some marshmallows (because I used the small jar of fluff) and Malt Powder, which really tasted good. If you want the original recipe that is probably much easier and doesn't involve my screw ups, you can click here. All of these changes are really starting to make me wonder why I'm even posting this, lol!


2C Milk Chocolate Chips
Marshmallow Fluff (Mine was 7oz, but should have gotten a bigger one)
2T Malted Milk Powder
Couple handfuls of mini marshmallows (not shown)
Start by melting your semi sweet chocolate chips in the microwave. Stir every 30 seconds.


Cinnamon Sugar Pretzels
Here's another little recipe I found on Pinterest. You can find the (hopefully) original author here although I changed it a little. These were quick and easy and pretty tasty. Here's what you'll need:
 1/2-2/3 Bag Pretzels (yes, mine is opened on the wrong end, lol)
1 Stick Butter
1/2C Sugar
2t Cinnamon
Start by throwing the butter, sugar and cinnamon into a bowl. Microwave until butter melts.
 Throw in pretzels and stir to coat. I found that a little more than 1/2 bag was enough. I tend to like lots of coating though. You may find you like less.
 Pour onto a foil-covered baking sheet and bake at 300 for 30 minutes. Stir every 10 min.
 Let cool completely and store in a baggie or other container at room temperature.
Notes:
These were quick and easy and tasted pretty decent. These would be an inexpensive little filler for a Christmas tray. Since I'm a big lover of all things caramelized, I'm thinking these would be even tastier if you cooked the liquid until hard crack stage, then coated the pretzels and baked. Anything that resembles caramel corn appeals to my fat side. If I make these again, I'll try that and let you know how it turned out.

1 Stick Butter
1/2C Sugar
2t Cinnamon
Start by throwing the butter, sugar and cinnamon into a bowl. Microwave until butter melts.


Notes:
These were quick and easy and tasted pretty decent. These would be an inexpensive little filler for a Christmas tray. Since I'm a big lover of all things caramelized, I'm thinking these would be even tastier if you cooked the liquid until hard crack stage, then coated the pretzels and baked. Anything that resembles caramel corn appeals to my fat side. If I make these again, I'll try that and let you know how it turned out.
Fried Cheese Sticks
I keep forgetting to take pix of my ingredients. Sorry about that! Well, these are so simple, you can remember the list. All that is needed is:
Egg Roll Wrappers
Mozzarella Cheese Sticks
Oil for frying
Marinara, if desired
Start by wrapping a cheese stick up in an egg roll wrapper. Start at the bottom corner and roll half way up. Fold in the sides, then continue wrapping the rest of the way. Wet the edges to seal.
 Heat your oil up in a pan. I just kept it shallow, but really should have gone a little deeper with it. As you can see in the next pic, the cheese didn't quite get melty enough.
 Turn every minute or so until they are browned on all sides. Drain on paper towels. Serve up with some marinara.
 I decided to make a little treat with some of the leftover wrappers by cutting them up and frying them. I sprinkled some with powdered sugar and some with cinnamon/sugar.

Egg Roll Wrappers
Mozzarella Cheese Sticks
Oil for frying
Marinara, if desired
Start by wrapping a cheese stick up in an egg roll wrapper. Start at the bottom corner and roll half way up. Fold in the sides, then continue wrapping the rest of the way. Wet the edges to seal.


Notes:
1) Use at least 1" grease or your cheese won't melt properly.
2) If I made these again, I'd use Lumpia wrappers. They are thinner and crispier. These didn't get cooked all the way through and were kind of gummy/chewy/flour-y. My hubby and my son loved them anyway.
Wednesday, November 21, 2012
Homemade (FREE) Slushie Magic
I suppose this post is a little late since it's no longer summer, but I think my kid would drink a slushie any time of year. I'm going to show you how to make your own slushie at home without having to haul out the blender, which I personally think is a pain because I hate taking it apart and cleaning it.
Every time the "Slushie Magic" commercial comes on tv, my son BEGS me for one, telling me he's DYING for one. Yes, dying, I'm sure. There was no way on God's green earth I was going to spend $20 plus shipping and handling for that silly thing, especially on our budget. Knowing the cubes were the key to the slushie making process, I set out to find out just what was in them. Anything I can make at home, I will. Some may call me cheap, some may call me genius. I always say there's a fine line between genius and moron, LOL!
The only thing I could find was that they seem to be made out of salt water. I suppose you could liken it to when you make homemade ice cream the old fashioned way. Remember how you had ice in the big tub, then added a bunch of rock salt to bring the temperature even lower? Kinda like that. Not knowing just how much salt/water to use was my dilemma. That, and what kind of container to use. Here's what I came up with. It did work, but I think my salt to water ratio might need some tweaking.
You will need the following: (sorry, forgot to take a pic)
Small water bottle
Salt
Mason Jar with lid
Drink of your choice
Start by soaking your water bottle in soapy water, removing the label. (I did that after the fact) Then fill bottle 3/4 full with water. We need to leave some room for expansion. Add in 2T-3T salt.* At least this is what I used. It was a complete guess, really. I used some cheap sea salt.
Don't waste your money using the expensive stuff. The rock salt mentioned above for ice cream making would probably not be recommended. Some of the salt leaches into the drink and I'm not sure if rock salt is safe for consumption. Best to play it safe.
 Put the lid on tightly and throw it in the deep freeze. It waited about two days (simply because I forgot about it) and mine still wasn't totally frozen. I'm not sure if it will freeze entirely. The part that WAS frozen was totally white, which I assumed was a good thing, like a little iceberg. Place your bottle down into a quart mason jar.
 Pour your drink in. I used Fool Aid. I only filled it half way full to allow room for agitating.
 Place the lid on tightly and shake shake shake. Be careful, it can get slippery when it gets cold. I had Mr. Happy Face do it. It only took about a minute and a half at most.
 Remove your lid and pour into a cup. See, it's slushie, it's magic. It's Slushie Magic!!!
 I took a tiny little sip and it tasted a bit salty to me. I'm no scientist, but it seems the salt leaches out somehow, even though it's sealed in the plastic. Some kind of crazy osmosis, I guess. Tommy thought it tasted great! I think he just liked the idea of the Slushie Magic in general. It's exciting to see it happen before your eyes.

Every time the "Slushie Magic" commercial comes on tv, my son BEGS me for one, telling me he's DYING for one. Yes, dying, I'm sure. There was no way on God's green earth I was going to spend $20 plus shipping and handling for that silly thing, especially on our budget. Knowing the cubes were the key to the slushie making process, I set out to find out just what was in them. Anything I can make at home, I will. Some may call me cheap, some may call me genius. I always say there's a fine line between genius and moron, LOL!
The only thing I could find was that they seem to be made out of salt water. I suppose you could liken it to when you make homemade ice cream the old fashioned way. Remember how you had ice in the big tub, then added a bunch of rock salt to bring the temperature even lower? Kinda like that. Not knowing just how much salt/water to use was my dilemma. That, and what kind of container to use. Here's what I came up with. It did work, but I think my salt to water ratio might need some tweaking.
You will need the following: (sorry, forgot to take a pic)
Small water bottle
Salt
Mason Jar with lid
Drink of your choice
Start by soaking your water bottle in soapy water, removing the label. (I did that after the fact) Then fill bottle 3/4 full with water. We need to leave some room for expansion. Add in 2T-3T salt.* At least this is what I used. It was a complete guess, really. I used some cheap sea salt.
Don't waste your money using the expensive stuff. The rock salt mentioned above for ice cream making would probably not be recommended. Some of the salt leaches into the drink and I'm not sure if rock salt is safe for consumption. Best to play it safe.


*(As a disclaimer and a warning: NOT that your child would ever consume the salt water inside the container, but you need to know that if you ingest 3T of salt, it will kill you!!! So keep that little salt bottle away from the kiddos when finished)
Friday, September 7, 2012
Omelettes, the easy way
I don't claim to be a chef by any stretch of the word, so when I figure out something that I find helpful, I want to share it with other struggling mamas. During certain times of my diet, I will eat something called a Big Ass Breakfast. Yeah, you read that right. No, it doesn't mean this breakfast will give you a big ass, in case you're wondering, lol. It does, however, ensure that you will not be hungry the whole day, which is sometimes nice when you've got a busy day planned. Since I make all of our meals at home, it's a nice option when I have to be away for all or part of the day. This post isn't really about my diet so much as it is about how to make an easy omelette, but I figured someone might comment on the sheer size of the finished product. Really...it's huge! There's a method to my madness, honestly. So let's get busy, shall we?
First of all, it helps to have an omelette pan. I do not own one, so we'll just use our every day run-of-the-mill pan, mmm'kay? I always start by browning some onions and bell peppers in some bacon fat, butter or coconut oil.
 Turn your burner all the way to the lowest setting. Sometimes I even take the pan off the burner for a couple of minutes if it's too hot from cooking the onions/peppers. Combine your eggs and a dash of cream, some salt and pepper and whisk together. Pour on top of your mixed veggies/fat in your pan. Your burner will stay on low the whole time.
 Shred some cheese on top. Yup, I do it now, even though the eggs are not set. Don't worry your pretty little head. Everything will be just fine. Deep breaths.
 Here's the part where I do something a little unconventional. I take a clean dish towel and gently lay it on top of the pan. PLEASE be sure your pan is the right size for your burner. In other words, don't use a small pan on a huge burner. I can get away with draping the towel over the whole pan because I have a glass top range. If you are using a regular electric burner, you can fold the corners of the towel in like shown. If you are using a gas range, this may not be a good idea altogether. Don't say I didn't warn you.
 So anyway, I just leave the towel on top and check it periodically to see if the eggs are almost set. You can tell this by shaking the pan back and forth gently. If it's jiggly, it's not done. If it's not jiggly, you're good to go. When your omelette is ready, slide a thin spatula around the edges to loosen it.
 Then flip a third of it over to the center. Looking good so far.
 Here's where I always screw up. Lift the other third of the omelette toward the center, breaking it in half, sending molten cheese spewing into the center of the pan! I'm covering that up with a strategically placed spatula! ;)
 And here's the even funnier part. If I had an omelette pan, that baby would slide right out, looking like perfection on a plate. Instead, I have to heave the hot mess out onto a plate, usually ending up with it broken in half. Looks gawd-awful!
 But it tastes like heaven on a plate! No burned, browned, over-cooked bottom. Just eggy, cheesy goodness.
 So, why is this towel thing any better than using a lid? Wellllll, from what I can tell, this allows some of the moisture to escape, yet keeps the environment just moist enough to not dry out the eggs. Any time I have used a lid, I end up with a watery mess. If I don't use a lid, I end up with a runny mess. Now, I know with a 'real' omelette, you're supposed to tip the pan this way and that, allowing the uncooked egg to slip underneath, blah blah blah. (Or am I thinking of a crepe? LOL!) Ehhh, who cares. I don't have the time or the equipment for that business. I'm going for EASY here, people. Give it a try and let me know what you think! Was it any easier than your prior attempts? It was for me!
First of all, it helps to have an omelette pan. I do not own one, so we'll just use our every day run-of-the-mill pan, mmm'kay? I always start by browning some onions and bell peppers in some bacon fat, butter or coconut oil.


Subscribe to:
Posts (Atom)
