Friday, January 27, 2012

Snickerdoodles

This is a cookie that I just adore!  It's so buttery and lightly sugared and cinnamony---yum!  I started making these about 15 years ago, but darn....where had they been hiding all of my life?!  They rank up there as one of my faves now!  Here's what you'll need:

Ingredients:
1C REAL Butter (2sticks) (Note that I have Crisco in the picture...ignore that)
1 1/2C Sugar
1T Vanilla
2 Eggs
2 3/4C Flour
1t Baking Soda
2t Cream of Tartar
1/2t Salt

In a separate bowl by itself, combine:
6T Sugar + 1T Cinnamon


Cream together butter and sugar
Add in eggs and vanilla.  Mix well.
Add in flour, soda, cream of tartar and salt.
Mix well.  Dough will start out looking crumbly.
But will get thick quickly.  You may have to do this by hand depending
on how sturdy your hand mixer is.
Mix together 6T sugar and 1T Cinnamon, set aside.
Grab a piece of the dough and roll into approximately
a one inch ball.  If the dough is too sticky, you can refrigerate it for a bit.
Plop it into your cinnamon/sugar mixture and cover completely.
Continue with more until you have enough to fill a cookie sheet.
Bake at 350 for 14-16 minutes, turning the tray half way through.
Cookies will be barely browned and somewhat soft while hot.
If you overbake them, they tend to get really hard, but still taste great!
Resist the urge to eat them all right there and transfer to a cooking
rack instead.  When completely cool, store in a baggie or cookie jar,
if they last that long.  Hey!  Who took a bite outta that one?!

Chocolate Chip Cookies

Is there really anyone out there who doesn't know how to make chocolate chip cookies?  Probably not.  But I do know a few people who can shockingly screw them up, lol!  So, why am I going to show you how to make them?  Well, we did these at Christmastime and I just didn't have anything else to post, lol. Gotta keep my few readers entertained somehow.

The one thing I did differently than normal is to use butter instead of margarine.  I always used to use marge, but then I read how horrible, terrible, no good and really rotten it is for you!  Not that the sugar or flour in these is much better for you, but hey....it was a small step in the right direction!  When I get a little more brave, I'll try making them with Xylitol and maybe almond flour...but that really scares me, messing with perfection...and it's pricey.  Not eating chocolate chip cookies would just be easier, but then life would have no meaning, would it?  Here's what you'll need:

Ingredients:
2 1/4C Flour
1t Baking Soda
1C Butter (2 sticks)
3/4C Sugar
3/4C Brown Sugar
1t Vanilla Extract
2 Eggs
1 (12oz) packsge Semi Sweet Chocolate Chips (NOT the Milk Chocolate ones shown in the picture.  My hubby bought these and they just ruined my whole day.  Maybe even my week, sigh.)
1C Chopped Walnuts (optional) 

In a large bowl, cream both sugars and the butter together.
Mix in the eggs and vanilla extract.
Dump in all of your dry ingredients.  I used to measure them all out
in a separate bowl and mix together, but why bother dirtying another dish? 
Mix together well.
Fold in chocolate chips.  I very seldom ever use a whole 12oz package.
I know, I'm weird.  Too many chips overpower the taste of the cookie for me.
I use about a cup and a half at most.
At this point, you would add your optional walnuts.  We opted not to
since we would be giving these away at Christmas.  Some (crazy) people,
my husband included, do not like them.  Crazy talk, I say.
Stick your finger in the dough and eat several bites.  Uhhh, measure
out little spoonfuls (or use a scoop) and place on a parchment-lined
baking sheet.  Or...use this really cool silicone baking sheet
I got for five bucks at Aldi!  I usually do a dozen to a tray.
Bake at 350 for 9-11 minutes until nice and 
golden brown like below. Ahhhh, chocolatey perfection!
Come to mama!
Eat two as soon as they come out
of the oven.  Transfer to a wire cooling rack to cool completely 
before storing in a cookie jar or plastic baggie.  Enjoy!

Homemade Wrinkle Releaser

A couple of days ago, my husband had this big red bag in his hands.  I asked him what was in there and he said a couple of suit jackets.  He said he only wore them for about 15 minutes each.  (GONG!)  Helllooo!  Then why are they shoved in a bag? I ask.  He tells me he's taking them to the cleaners.  Uh, okayyyyy.  You wore them for 15 minutes and you're taking them to the cleaners.  Why?  Because they're all wrinkly from being in this bag.  OMG.  Really?!  I snatched that bag right outta his hands and decided to make some homemade wrinkle releaser.  That is, after carefully sniffing the suit jackets to be sure they weren't smelly.  They weren't.  So, here's what you'll need:
1C Water
1T of your favorite Fabric Softener
1 Small Spray Bottle complete with Mr. Yucky drawn on it so your son knows not to spray it in the dog's face.  Not that I ever have that problem.  My child is an angel, ah-hem.

Mix fabric softener and water together in spray bottle.
Give it a shake, then spray on wrinkly garment.  In this case, a suit jacket.
This is what it looked like before de-wrinklifying.  Yes, that's in the dictionary.
Look it up.  Hey, this looks like something a hobo would wear!
As you spray, run your hands down the garment 
to smooth it flat.  It will be all spotty like this.
Be SURE  your garment can get wet before doing this!
And this is what it looks like afterward.  Well, mostly.
I got sick of waiting for it to dry.  It looks saggy because
I kept pulling on it and running my hands down it.
It ended up looking good and smelling even better!  Bonus!
I used only about 1/4 of the bottle.  I'm guessing it cost me less than a dime to do both garments.
Now, that's a LOT cheaper than buying the store-bought stuff and a heckuva lot cheaper than the cleaners!

Tuesday, January 3, 2012

How to put a PRINT button on your blog.

Several months ago, I searched all over the internet, trying to figure out how to put a print button on my blog.  I found a place called something like Print Friendly, but it wasn't as 'friendly' as I had hoped.  I finally found a tutorial, but when my computer crashed in October, I lost all of my files.  Sooooo, I thought I'd write up a tutorial for you so you don't have to go through the PITA (Pain In The BEEEEEEP) that I did.  Now, I don't know if this works for other blogs, but I know it works for Blogger blogs, so please don't email me asking how to put it on other sites.  I'm not a computer genius.  I know just enough to be dangerous, LOL!


You need to go to www.sites.google.com and create somewhat of a dummy website.  While it is actually a site, I call it a dummy because it's just there to serve one purpose.  Don't worry...it's not as hard as it seems.  For some reason, blogger will not allow these printable types of pages on our normal blogs because they take up too much space (or some stupid reason I can't recall).  But if you start a free website on the google sites, you can use it as a separate site for followers to print things.  
On this site you are reading right now, if you go to one of my recipes (or even at the bottom of this post), click the printer friendly button and look at the wesbsite at the top.  You will see that it changes to something like sites.google/soNotbetty/chocolatecarrotcake or whatever recipe you are viewing.  It's basically taking you to another SITE to do the printing.  I know that sounds like too much trouble, but it will get easier with time, I promise. So, here goes:


  • Go to Sites.Google.com, sign in with your google info.
 
  • Then click on the RED CREATE button
 
  • Select BLANK TEMPLATE. This will just highlite the template, but will not take you to a new page.  Scroll down and type in the name of your current Blogger blog into the box.  My dummy site name looks like this:  https://sites.google.com/site/mytestblog.  Type in the captcha security word at the bottom.  Click the red button at the top that says CREATEThis will take you to a plain looking webpage that is now your site for printing.  You just made your dummy site! You will not have to do these steps again.  From here on out, we'll call your blog BLOG and your dummy site your PRINTING SITE, okay?  Okay.
 
  • At this point, you will want to open another Windows tab and bring up your normal Blogger blog that you've been posting recipes/tips/tricks/tutorials (or whatever) to.  This way, you can copy stuff from your blog over to your printing site. You should have them both up where you can click on either tab like a toggle to view the pages individually.  This is just a dummy blog I created a long time ago to test out blogging tips and tricks without ruining my regular blog:
  • First, we'll go to the Printing Site.  Toward the top right, there is a pencil icon and a piece of paper icon with a + sign on it.  If you hover over it with your mouse, it will say NEW PAGE.  Click on that.
  • This will bring you to a page that says: CREATE A PAGE IN SITE: yourdummysitename.  It will have a box below that that says name your page: __________________________  You can't know what to name it until you know what recipe/post you are using from your BLOG, right?  So, click on the other Windows tab for your Blog and find a recipe/post you want to print.  Remember the name and type that name into the Name Your Page box.  Ignore the stuff below that and click the red CREATE button up above.
  • Let's just say our post is called Simple Santa Suit Card as above for an example.  Type those words in the box and it will bring up another page that says Simple Santa Suit Card in a header box and then it will have a blank box below it.  It may take a few seconds to appear.  This is where you are going to copy and paste your recipe from your Blog.  To do that, go back to your Blog and find your Simple Santa Suit Card post/recipe or whatever yours is called.
  • Assuming you know how to navigate your Blogger Blog, I'll assume you know how to edit a post by clicking on the pencil at the bottom.  It will bring up the edit mode.                        
  •  Right click in the body of your post and it will bring up a small menu box.  Click on SELECT ALL.  It will highlite everything in the body blue.  Then right click again and click on COPY.
 
  • Now, click on your other Windows tab for your printing site.  In that body area beneath the header, you are going to right click and select PASTE from the pop up menu.  It will paste your entire recipe and all of the pix in there.      
                                                              
  • Since we're trying to make this PRINTER FRIENDLY for the follower/visitor, we need to get rid of any excess verbiage and pictures. 
  • Go through and highlight any unnecessary chit chat and hit delete.  Click on all pix and hit delete.  No one wants to waste their ink on that, right?  
  • When you have it condensed (you may have to move a few things around), it should look pretty simplified like below.  Click on the blue SAVE button at the top right.  Don't close this page because we're not done.    
                                                                                                          
  •  You need to scroll to the verrrrry bottom of the page and you will see the following.  Click on PRINT PAGE (we're not really going to print it...but this is necessary to get the correct LINK)  
Print Page ^ Right ^here
  • When you click on print page, a print box will come up.  Click CANCEL.  Why cancel?  Aren't we trying to PRINT this after all?  NOOOOO!  We're trying to get the link so OTHERS can print it!  We don't want to print it because we already have this info ourselves and that would be silly.  We also want to see what our followers/visitors will see when they click on it to print for themselves.  And lastly, if we don't click print page, then cancel, we won't have the right link for the follower/visitor to print.  You'll know if you do it wrong when all is said and done because it'll just bring up an error page, or maybe even tell you it's not available.  I can't recall right now, not that I've ever done it wrong.  Ah-hem.   Anyway, you click CANCEL. 
  • Now, look at the web address (URL) in the top box.  It should be something like this long dummy one: https://sites.google.com/site/mytestblogabc/simple-santa-suit-card?tmpl=%2Fsystem%2Fapp%2Ftemplates%2Fprint%2F&showPrintDialog=1             It's long and weird looking, I know. Yours will have your blog name and the name of the post in it somewhere.  Right click on that URL and click on COPY.
  •  Go BACK to your food blog.  You should still be in edit mode from last time.  If everything is still highlighted blue, just click somewhere in the body to get rid of that. Do NOT hit the space bar or your will erase your entire post.  You can always retrieve it by clicking the undo arrow, but it'll make you scream, "Ohhhhh, cuuuhhhhhrrrrappppp!" for a minute.  
  • Scroll to the very bottom of your post and type the words PRINTER FRIENDLY or PRINT or PRINTER FRIENDLY VERSION. Whatever trips your trigger.  I highlighted mine and colored it blue.  You can do whatever you think make the world a happier place.
  • Once you have it typed, highlite the words, then click on LINK up above.  I use the old version, so mine says LINK.  Yours may just have a little Earth icon with a chain link over it.  It will bring up a box.  You are going to take that long link you just copied from your printing site and PASTE it into that box, then hit OK. In my old version of Blogger,  I make sure the "Open In New Window" box is checked (even though it doesn't appear like it below). I did this recently for a friend and hers did not offer me that option.
  • Then click the orange PUBLISH POST button at the bottom left.  
  • Click View Post to see if the words PRINTER FRIENDLY are on there and are clickable. 
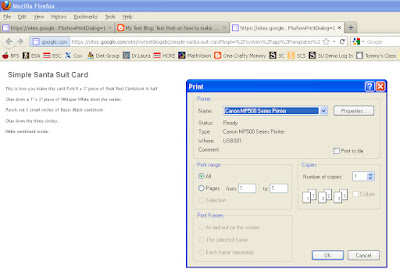
  • Click on PRINTER FRIENDLY VERSION to see if it brings you to a different page to print and brings up a printer box with OK or Cancel like below. It should work.  Print the page if you'd like to test it.
  • Then you can just go back to your printing site and click HOME in the upper left hand corner.  Bookmark it and close it.  I didn't bookmark mine to begin with, then I couldn't find it later!  That's hard, especially when you can't remember the name and it's been 2 months!
  • Each time you bring up the printing site to copy and paste a recipe, you will just click that little icon with the + sign on the paper and do the same procedure again from that point.  This seems awfully long right now because I've told you how to do it from the very beginning, including site set up.  You don't have to do that again.  I assure you, once you just have to copy and paste a recipe and create a link, you can do it in two minutes!