Go to the fridge and look for your bacon. Realize you forgot to thaw it last night and say, "Oh, crap!" Go to the garage, get your bacon out of the freezer and throw it in the sink. Cover with warm water. Wait 15-20 minutes. Get yourself a nice cup of coffee and read the paper while you wait.
Now, I want to show you something about this bacon. See that? In the upper, right hand corner. That says "Lower Sodium". I don't necessarily WANT Low-Sodium bacon, but I did want sugar-free bacon. (Been avoiding sugar and grains lately...long story) Anyway, if you have a diet requirement of LowSod, Kroger sells one (shown below) that is pretty decent, but you get the added benefit of no sugar. Everyone could use a little less sugar, I suppose. Unless you're a sour puss, then by all means, buy the Brown Sugar cured bacon...mmmmmmm. If you do not require low sodium, you may actually want to SALT this bacon after it gets done cooking. Yeahhhh, it's kinda bland. On with the show...Preheat your oven to 400 degrees.
Like I really need to show you this, but you take kitchen shears and cut around 3 sides of the package. Who knows, maybe someone in a remote country is reading this and thinking...I never knew!!!
This next part is optional, but I like to think it makes things go faster. I cut the entire package of bacon in half.
Line a sheet pan (or two) with aluminum foil. Be sure your foil is wide enough to have an edge sticking up on all sides. We don't want the bacon grease to get under the foil, making us have to clean a skanky pan! God forbid! Of course, you really should clean your pan anyway, but who wants to scrub scrub scrub?
Next, lay down your bacon in tidy little rows, being sure not to overlap. If you are worried about your bacon splattering (it really doesn't that much), you can always put a piece of foil on TOP of the bacon, too, but I find that it takes longer to cook and doesn't get as crispy due to the steaming effect inside the foil.
UPDATE! I am a total liar!!!! It splatters like the dickens! You just don't know it until after you've done a few batches in a row! See my oven cleaning recipe HERE. What was I thinking?!
UPDATE! I am a total liar!!!! It splatters like the dickens! You just don't know it until after you've done a few batches in a row! See my oven cleaning recipe HERE. What was I thinking?!
Pop both trays in the preheated oven. I like to stagger them a bit. Set the timer for 10 minutes. It will not be done in 10 minutes, but that's a good starting point. My bacon is very thin.
Check every couple of minutes after that.
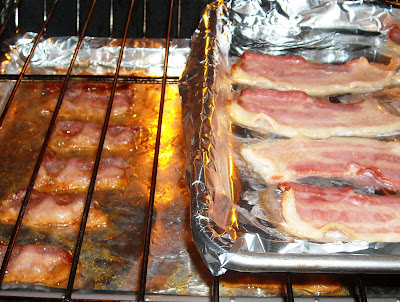
Your bottom tray will quite obviously cook faster than your top tray as it is closer to the heating element. See the difference? I sometimes switch them around at this point.
I take them out when they look golden brown, not too dark. They tend to be a little more 'done' than they look, so err on the side of caution. Boy, those little guys shrink up a lot!You'll want to remove them immediately to drain on paper towels. Be sure to blot the fat off the top, too. See that big puddle of bacon grease? Don't throw it out! Strain it through a coffee filter into a container and keep in the fridge. Makes a great oil to cook your eggs in, make a bacon vinaigrette, or to cook green beans in. That's the way Grandma woulda done it! No waste!
Serve your bacon up with 'Leftover' Eggs and you have a high-protein, low-carb, veggie-filled lovely brekky! Yum!
When you've had your fill of bacon, store it in a baggie and throw in the freezer. So handy to be able to just grab a couple of pieces for breakfast or to add to a recipe. You can either nuke 'em for a few seconds, or do like I do... When I get done frying a couple of eggs, I throw the frozen bacon in the pan and it's hot and crispy in a couple of minutes. Shoot, you don't even have to thaw them or crisp them. Half the time, I grab a frozen one and gnaw on it, lol. I'm serious....they're good!


Wow..I didn't even think to freeze cooked bacon! How handy is that to have on hand when you need some! Thanks for the great tip!
ReplyDelete