Sunday, May 20, 2012

DIY French Manicure

I'm not a high-maintenance gal in the least, thank God.  But sometimes you feel like making your nails look a little nicer than they usually do.  If you don't have the money to spend at a fancy schmancy salon, what is a frugal gal on a tighter-than-a-girdle-budget to do?  Do it yourself at home, of course!  Here's what you'll need...

Nail polish in white and nude  (or colors of choice, but one must be transparent)
Nail polish remover
Orange Stick or Q-tips
Cotton ball or pad
Now, you might be saying to yourself...well, you already have a French Manicure kit (from the 1990's)...why not just use that?  Well, I could, but I won't.  I have never gotten those little strips to sit right on my nails and they always looked messy and crooked afterward.  Besides, people nowadays are doing them with all sorts of colors and I don't want to limit you, so use whatever polish you like! (even though I think it looks weird when people have purple or red nail tips, lol)  So, how do we go about this?

Start by pouring a little bit of your nail polish remover into the cap.  Be sure to pour a bunch on your counter, like I did.  Actually, don't do that.  Be very careful where you do this as that nail polish will eat the finish off of lots of things!  Someone found that out the hard way by setting a bottle of nail polish remover on their sister's veneered dresser and received a thorough flogging. But I wouldn't know who that was.
Take your orange stick and pick up a few fibers of the cotton, then twist it around like cotton candy.  We're not looking to get a lot on there, just a very thin layer.  
Twist it and smooth it out with your fingers to make any stray fibers lie flat. Set aside. 
 Before we start painting, be sure your nails are cleaned and trimmed/filed. If your cuticles need trimming or conditioned, now would be a good time.  Using the white nail polish, paint the tips of your fingernails that extend past your finger.  If your nails are really short, you can just do a small, curved line across the top.  Avoid going straight across the top.  That just looks weird and I can never figure out why people do that.  It looks so unnatural.  As if perfectly white fingernails look natural, right?  LOL!  Anyway, just do a sloppy job of it.  We're gonna clean that up in a minute.  
Your nails will look something like this.  I ended up doing a second coat because they were a little streaky.
Now, dip the cotton end of the orange stick into the remover.
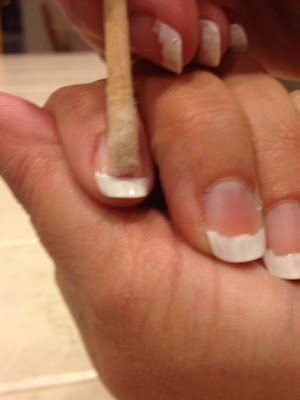
You might want to dab a little bit of the excess on a paper towel first.  Take the stick and rub it back and forth over your nail in an arch, essentially removing the unwanted polish.
When I do the others, I fold my hand over like this because it's easier. Continue with the rest of your nails.  It's always hardest to do the other hand.  This would be a good time to have a friend/family member help you.  They won't be perfect, but the nail salons are never perfect either.
 Wait until dry, then put a coat of your lighter color over it. 
When dry, you can go over it with a nice shiny clear coat if desired.  Work quickly and use more than you need because it will smear your work if you go over it too many times or take too long.  Here's how it looks afterward.  I eventually did a 2nd clear coat for durability.  I figured I'd at least make it last a few days.  OMG, whose old, fat crepe-y hands are those?!
I don't know how much a French Manicure costs at a salon, but I'd wager to say that I saved myself a good $25 by doing it at home.  Funny, people nowadays seem to think that a manicure is a necessity rather than the luxury it really is.  People have become such pampered pooches that we've forgotten how to do anything for ourselves and I think it's kind of sad.  I see young girls (12-13 years old) every day that have professional manicures and highlighted or dyed hair. (I know because of the fake nails and the too-good-to-be-done-at-home highlights....are you kidding me?!?) This annoys the tar out of me.  Maybe it's just me and I'm an old fuddy duddy or jealous because I don't even have that luxury myself, but I can't help but think these people are setting their little princesses up for disappointment in life.  I also can't help but think of their overly-high expectations of their future husbands, who will be a dismal disappointment when they can't afford these luxuries.  When they get in the 'real' world and have 3 screaming kids and a husband that works long hours, the focus is more likely to be getting in a shower that day, let alone the manicure they'll never be getting, lol.  Why start them out headed for disappointment?  I've never met a man who wanted a high-maintenance woman, in all honesty, but all men want women who keep themselves looking well-groomed.  We can keep ourselves looking nice by doing our own hair and nails, even on a limited budget with limited time.  This literally took less than 1/2 hour and cost me just pennies. Give this a try yourself and let me know how it turns out.  Okay, rant over.

Friday, May 11, 2012

Curling your hair with a sock!

Are you sure you read that title correctly? Yup, I said curl your hair with a sock!  Here's how:

First, you need an old sock.  I used one of my son's that no longer fits.  Cut off the toe.
Then cut the rounded part off of the toe, creating a little band.
It will look something like this:
Use the band to put your freshly washed and dried hair up into a high pony tail up high on your head like this:
Take the sock and roll it down into a little donut kinda like they used to roll down socks way back when.   Slip it over your pony tail and bring it down to the base.  Forgot to take a picture of it, but you need to lightly spritz your hair with water.
Then pull it up toward the ceiling, stopping just short of the ends of your hair.
This next part is kinda hard to explain, but you're going to try to wrap your hair downward around the sock and roll it down into a bun. 
 As you can see, a few stray hairs tend to fly about.  It does take some practice.  Once you get them tucked in, you can just roll it all down like a bun.  
You don't even need to use anything to hold it in.  It stays in by itself!
Then just go to bed!  It's so comfy to sleep in because it's at the top of your head.  No bulky curlers to lay on!  Ouch!  The next morning, gently unroll the bun.
Rake your hands through your hair and be shocked at the volume and curls!  My pictures were really dark and you couldn't see the curls, so I had to mess with the brightness and contrast, hence the crappy photos.
Here's what it looks like with a clip in my hair.

And here's what my hair normally looks like.  It actually doesn't take up a lot of the length like normal curlers would.
This looks really nice on people with longer hair.  It gives that loose ringlet look that is so popular, but with minimal effort.  It is also ideal for those who bathe at night.  I can't really get away with that as my hair starts smelling oily half way through the day, but it was a nice change!

Wednesday, May 9, 2012

DIY Jahng Bong/Bo Staff

Okay, first of all, you might be asking yourself what a jahng bong is!  Well, it's a staff my son uses at Tae Kwon Do with more and more frequency lately.  A couple of months ago, before our TKD tournament, Master K told us we should probably purchase one, so we did.  It's 5 foot long and a little less fancy than those shown below. This is the one we use for what is called 'forms' and 'creative weapons'.  This staff is not used for fighting.
Then, the week after the tournament, the kids started using some thicker jahng bongs that the studio has on hand.  These are staffs that are used for fighting, meaning their staffs will whack against their opponent's. They basically look like a thick broom stick, or dowel that has been stained brown.  Again, it was suggested that we get one of our own.  We don't have to purchase weapons often, so this came as an unpleasant surprise to my wallet!  Considering we had just spent a hefty $60 on the 'nice' one, there was no way I could afford to buy another one.  Besides, it looked so easy to make.  So, here's my version...only a pimped out version of a jahng bong!

I started by buying a 1 1/4" x 6 foot wooden dowel.  This one is made of poplar and pretty durable.  It cost $6.48 at Menards.
I then marked off a line about a foot down.  The staff is supposed to be the height of the child, or a few inches taller.  Tommy is about 4' 6", so I just made it 5 foot because he's obviously only going to get taller.
I then wrapped around some painter's tape.  This helps to stop the wood from splintering when cut.
Then I cut the excess off with a hacksaw.  I saved the 1 foot scrap for another project. Or to whack my husband with while he sleeps.  ;)
I peeled the tape off and sanded the cut end to make it as smooth as possible.
Then I sanded the whole staff to smooth it all out so my baby boy wouldn't get any slivers!
I then painted the whole staff black using a sponge brush and some leftover paint we had lying around.
While it was drying, I found a template for some flames online and cut them out with an Xacto knife.
I taped it around the base of each end of the staff.
I traced around it with a white pencil while holding the 'stencil' down. This would be a great time to have one of those fancy machines that cuts out sticky vinyl pages so I could have used the inverse and just painted away! Sigh.
So, I then gave it a coat of white acrylic paint on each end as a sort of primer.  I knew covering that black paint was going to be a chore!  I actually ended up doing two coats.
Then I gave it a coat of yellow, figuring I'd layer the colors on.  I've never done flames before, so this was a real experiment!
I then added a watered-down layer of orange.  Because the paint was drying in between coats (due to the time-consuming design and the unusual shape of my 'canvas'), I was worried how I was going to blend these layers together.  I haven't painted anything in years, so my technique is not the greatest.  I ended up using a damp paper towel to 'scrub' in between layers to smooth out the transition between colors.
I then side-loaded a brush with water and red paint and attempted to blend the red in.  Deciding the flames needed more red, I painted in a little more red at the tips of the flames.  You can see it better in the next picture.
Then I realized my black portions in between were really looking muddled because of all the layers, so I decided I had to re-paint those in with black.  What a pain.
I then moved my little artpiece outside and propped it up on a couple of plastic baskets.  Using a clear lacquer, I sprayed the staff several several several times, phew!
After letting it dry, I could finally take a picture of Tommy's new Jahng Bong!  My only worry now is that it's too nice to use for 'whacking'.  The first chip it gets on it will be painful for me, lol!  But hey, the thing cost me about $8 in all and Tommy LOVES it, so I guess I can't complain!  I'll try to get a picture of him in his uniform using his new staff tomorrow at TKD.

Saturday, May 5, 2012

Making a grass skirt for pennies

A few weeks ago, Tommy's school was having Hawaiian day.  People wear all sorts of crazy get-ups on 'spirit days'.  I only had a floppy flowered hat, but Tommy wanted more.  The problem was, I had no spare money to spend at the time, so we had to get creative.  He decided he needed a grass skirt!  Yes, a moment of "ohhh, gawd...is he gonna get laughed out of class?!?" did cross my mind, but he was insistent.
Since he's only in 1st grade, I figured he'd be okay with his choice.  Besides, our school has lots of spirit.  Even the 6th grade boys were dressed up, so all is well.

Anyway, you may or may not know that in my spare time, I am a Stampin' UP demonstrator.  Every time I get a shipment, I get this big long piece of brown paper that is perforated every 10 inches or so for easy tearing on the packer's part.  I've been saving it up, wanting to find a use for it and I think I've finally found it!  You could just use some of that brown paper that comes on a roll.  I started by making a crude measurement by wrapping the paper around my son twice, then tore it off at that length.  I then zig-zag folded it and smoothed it down as flat as I could make it like so: 
I then folded it into thirds, leaving the edge where the waist would be, sticking out and away from the area I intended on cutting.  I cut at about every 3/4" or so. Looking back, 1/2" would have looked better.
I then attempted to cut it into strips with my guillotine cutter, having to stop before it cut all the way through.  In all reality, it was too thick and I had to sort of chop chop chop to get it to go through even part of it.
I ended up having to cut it the rest of the way with scissors.  The guillotine did save me hand a bunch of cramps from the scissors though.  Did you know it's impossible to take a picture of your hands while actually using scissors?  I'm holding right-handed scissors in place with my left hand while taking the picture.  Like you just had to see those scissors in order to know where to cut, right?!
I then unfolded it and it looked pretty good!
But some pieces were sticking down extra long and I have no clue why.  I had all the edges lined up.  Maybe they broke off, no clue.  So, I just gave it a quick hair cut.
Since there is a perforation that could easily come apart every 10", I decided I had better tape them for reinforcement.  It's hard to see, but I just taped them front and back.  This will help to hold the layers together, too.
Then I had to deal with how to make a 'waist' out of this thing!  I lined up my edges and folded the end over about an inch, inch and a half, intending on making a tube for my jute to go through.
 I cut a piece of jute about two feet longer than the width of my skirt, then lay it down in the valley of the fold.
Then I folded the paper over twice to encase the jute.
And taped it down along the inside.
Because the jute could slide back and forth, I decided to put a couple of staples in to hold it in place.
I then pushed the staples flat so they wouldn't poke/scratch my son.  I then put a piece of tape over them for added protection.
I held up my new grass skirt and it was lookin' pretty good!
I wrapped it around Tommy twice and tied it with the jute and it looked great!
Tommy gave it a hula-hula test for good measure!
He said everyone liked his skirt at school and no one teased him.  He had a fun day...
until he got in trouble for hula-hula-ing too much and disrupted the class and got it taken away, lol.
We actually still have the skirt for another occasion, if needed.  I feel good about recycling what would be trash and spent only a few pennies on the whole thing!  What kind of trash have you turned into treasure?  Fun, isn't it?