Saturday, June 30, 2012

Clean your filthy tub, you slob!

Oh, SORRY!  That was directed at ME!  Do you have a bathroom in your home that tends to get neglected?  Mine would be the upstairs bath.  I'm not sure what my excuse is.  Perhaps denial or avoidance.  Regardless of the reason, it was just realllllly gross.  It was even growing some of its own science experiments without my permission!  Blech!
A while back, my friend Mary sent me a link to a tub/shower cleaning recipe on Pinterest.  I finally got desperate enough to try it!  It's amazing how you can get motivated when you're having out-of-town guests visit!  

The recipe calls for equal parts Dawn Power Clean dishwashing liquid and vinegar.  I only had regular Dawn, so that's what I used.  I mixed them together in a spray bottle.  I didn't realize until afterward that it said to zap it in the microwave for one minute.  I'm not really sure how this would improve the cleaning, but I did not do it and it worked just fine.
I just sprayed it all over the filthy petrie dish of biological warfare, er, tub and shower liberally.  The smell of the mixture was surprisingly strong to me. I should have used a mask, but you may not be as sensitive to fine mists as I am.  It sure smelled like it was working!
Okay, try not to think of me as the worst slob ever, but THIS is what my faucet looked like before cleaning. (She said, hiding her head and cringing).  As a disclaimer, we have water so hard that it sometimes knocks us out, lol!
After a few minutes of soaking, start to scrub.  Hmmmmm, it definitely looks whiter!
There's always a lot of soap scum where the sides meet the bottom of the tub.  I had to give it quite a bit of elbow grease to get this clean, but I'd probably have to do that anyway.  I am glad I had this scrubby because it would have been too big a job for a sponge.
I did the walls with this, too, even though they weren't that bad.  We do actually squeegee, believe it or not, lol.  Give it a good rinse and voila!  Looks pretty good!  There's still some dark spots on the bottom, but that's not terribly unusual.  I might make up another batch and let it sit on there longer to see if that will take off the rest.
Here's the AFTER picture of that scummy faucet.  Big difference!
The tub/shower looked so sparkling clean, it made me wonder why I had put it off so long.
It felt so good, it inspired me to give myself a pedicure in it!

Friday, June 29, 2012

From skanky to swanky in 15 minutes

Have you ever looked at your feet and suddenly thought....OMG!!!  How did my toenails get so horrendous?!  Chipped nail polish aside, these look like bear claws!  Although you're probably distracted by my sexy flip-flop tan lines!  You know it's true!
If you're like me and don't have the money (or lack of common sense) to pay $40 for a pedicure, then do it yourself at home.  Your feet will feel so good and you'll feel pampered.  It's a nice little way to take care of yourself.   Here's a quick rundown of how I do mine when I'm pressed for time, which is all the time it seems.  


Run a few inches of hot(ish) water in the tub and add in some cheap shampoo for bubbles and a nice smell.  When I have more time, I use my foot spa thingy dingy and let them soak a long time with the massaging/vibrating feature on.  Hea-VEN!
Remove your chipped nail polish.
Plop your feet in the hot water for a good soak.  If you have really tough calluses, let them soak for quite a while to soften them up.  It'll make them easier to remove later.  Sit back and play a game of Words with Friends on your phone.  I swear, I have upwards of 7 games going at any given time!  So fun!  Don't drop that phone!
After a few minutes, use a foot pumice stone/bar to slough off the dead skin.  Note the toe ring.  I got this 15 years ago with an old boyfriend.  Don't tell my husband.  That boyfriend was killed in an accident and I've just never had the heart to remove the ring even though I'm certain I'm probably too old for it. 
I found this awesome little pumice thing that's shaped like a sponge called Mr.Pumice.  It's really lightweight, unlike the old fashioned pumice stones. It gives a little when you use it and doesn't take off tons of skin.  It's gentle enough to use every day or two (or when I remember), and only cost about $3.00 at Sally Beauty Supply.  Love that place!
Next, I scrub my feet and calves with a cream that has some little seeds in it for exfoliating.  I believe this is called Raspberry Pomagranite Body Scrub by Queen Helene.  Also from Sally Beauty Supply for a few bucks.  Be sure to get your ankles and between your toes really well.  You'd be surprised how much dead skin is hiding there.  Ack!
If you're feeling up to it, you can give your hands a quick scrub, too.  They're going to be wet from rinsing your legs off in a second anyway, so have at it! You can just rub your hands together now, or use the cool little kit below.  My sister-in-law gave me this little hand scrubbing kit from MaryKay several years ago and I love it.  I save it for when my hands look really bad and it works like a charm every time! 
Pat your legs and hands dry and apply some lotion.  I didn't take a pic of that cuz my hands were greasy, but I'll just be confident that you know how to do that on your own. :)  I highly recommend extra virgin coconut oil.  Nothing compares to it in the skin softening department!  Once you try it, you will never want to go back to regular lotion with all of its chemicals and nasty stuff.
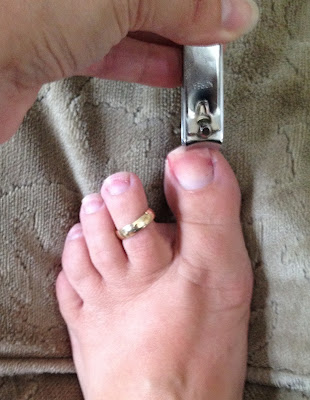
Next, trim your nails.  They'll be nice and soft now.  Ack!  Mine are all stained from my old nail polish.
File.
Clean beneath your nails.
Use a cuticle stick to soften up your cuticles. Coconut oil would probably work for this, too.  I bought this years ago and have finally used the last of it.  Love this little thing.  I'll be keeping my eye out for another one soon.
After a few minutes, you can use the rubbery end of the stick to push the cuticles back and even scrape away some dead skin...ewwww.
Wipe off any excess cuticle cream as it kinda has a waxy-ness to it that repels the nail polish.  Sometimes I'll even run some remover over my nails again.  Paint your nails as desired.  I always use a nice red as I think it looks good with everything.  It's funny because I seldom paint my fingernails unless it's a special occasion.  When I do, it's a natural color.  But RED toenails are just....purdy!
Ahhhhhhhhh!  Sit back and admire your pretty new feet!  Doesn't that feel better?  
Knowing you've saved a good hunk of money doesn't hurt either!  Whoo hoo!

Thursday, June 28, 2012

Handemade flower pouf clip

To go along with my new little ruffle scarf, I decided to try my hand at a couple of little flower poufs.  The first one is the one I based this tutorial upon, but I really like the 2nd one better.  They're made the same way, just different shapes, that's all.
LOVE this one!
Here's what you need:
An old shirt
Glue Gun/Sticks
Scissors
2 Punched Circles (mine is 1 3/4" and cut from a cereal box type of material)
Hand Drawn Template or in this case, a Sizzix die

Start by cutting off the sleeves and top part of the bodice, just under the arms.  We can save the bottom portion for another project! This shirt was actually purchased about 4 years ago, but I have never worn it!  It's always been too big and dumpy looking, so I might as well turn it into something useful!
Cut out little portions of the bodice and sleeves to cut your flowers out of.
Run them through your die cutting machine.  You will need 9 flowers.
If using a paper template, just pin it to your fabric and cut around it.  This was made using a punched flower that I increased in size with my scanner/printer and cut out.
So, now that we have them cut out, we need to start assembly.  Take a flower and fold in half.
Then fold in half again.
Apply a bit of hot glue to one of your cardstock circles and glue down four of your folded flowers, meeting
in the center.
Gently open the flap to the middle of each flower and put a spot of glue. Lay flap back down.  
Fold four more flowers and glue down in a similar fashion, this time turned an 1/8 of a turn.  
After inspection, I decided the glue should go along this edge rather than in the center.  I could be wrong.  I frequently am!
Fold your last flower in half
Then roll up one side
Put a little line of glue in there to hold it shut.
Then cut off about 1/2" from the pointed part.
Then take some glue and put it on your flower base like so.
Put the bud in the center and push down.  
Before the glue cools, pull up the petals toward the bud so they attach.
I felt like I needed to hold the center of the flower down a little just as an added precaution.
Deciding my flower was looking a tad flat, I opted to put a little more glue here and there.  I think it had to do with the weight of the fabric.
Having no clue how I was going to clip this thing to my scarf, I came up with this solution.  Punch out your 2nd circle as follows.
Then glue it down on top of your first circle.  See, you have a little place to slip a hair clip under there!  Sometimes I amaze myself.  Most of the time not, lol.
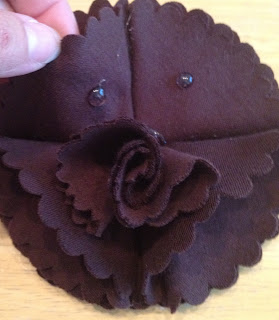
And there you have your little flower poof to dress up your scarf!  Hmmmm, this one is a little big.  But for my first try, it's not bad.  Kinda hard to see the detail in the picture.  Can't wait to try the peach colored one.

No-Sew Ruffled Scarf

Isn't this just the cutest?  Wanna make one?  Heres how...
Now that I've lost a good bit of weight, my clothes don't really fit anymore.  Take this Nike t-shirt, for example.  As you can tell from the wrinkles, it's not one I wear often.  Mostly for painting or dirty work.  The shirt is kinda nasty, has some bleach stains on it and holes in the pits, lol.  This is my 'holy cow' face.   This thing used to fit me perfectly.  Scary. 
Anyhow, rather than trash it or turn it into rags, I thought I'd find a way to re-purpose it.  Enter Pinterest!  I found a tutorial on how to make a ruffled scarf that looked pretty easy.  Here's what you'll need:
An XL/XXL t-shirt, the bigger the better.  You can steal one of your husband's!
(I found out afterward that jersey-knit would have been a better fabric choice)
Dinner sized paper plate Approx 9 1/2 inches
Scissors
Pen
Pins
Fusible Webbing or Fabric Glue (not shown)
Iron (not shown)

Start by spreading your shirt out on the table.  Stand back and be amazed at how huge this shirt really is and admit that you must have been in denial for a lonnnnnng time. Seriously, this thing is almost as wide as the tabletop, yikes!  Place the paper plate face-down in an area where you won't run into any seams or logos.  We want just plain fabric.  You are going to try to get about 4 or 5 sets of circles out of the double thickness, or a total of 8-10 individual circles.
Trace around the plate.  Move plate to another free area and continue until you have used up all the free space.
Pin the center of each circle, then cut out.  Be sure to cut inside the line so you don't have any ink marks on your finished scarf.       
You should have a nice little stack o' circles.  
Cut each circle into a coil.  Try to keep the strip around 2 inches wide.  The example below was only about 1 1/2" and it ended up being wayyyy too long when finished.  
This one is a little better.  You'll have one little corner that is somewhat squared near where you first started cutting.
Cut that little baby off so it's more rounded.
The inside of your coil should look something like this
After cutting all of your circles, cut off the little pointed tip of each.  You just want a straight line.
One video tutorial I watched said to stretch each coil of fabric.  This is really hard to do and take a picture of!  Stretching makes the fabric curl a little on itself, intensifying the ruffled look.  Since mine is a regular cotton t-shirt, I didn't stretch too much or it looked strange and limp.
Lay the strips down, 5 (or 6) going opposite directions.  Yes, I realize there are 7 going each direction.  I had two shirts, so I used them both.  I would have made two scarves, but I screwed up the first couple of coils.  I paid no attention to which direction the coils were facing as long as the straight ends were together.  
Take some fusible web and put it in between each end.
Fuse together with a hot iron.  Do for each set of strips.
Stack all of the strips on top of eachother, meeting at the seam.  I staggered them, some facing one way, some facing the other, just for the heck of it.  Another tip: I forgot to do this until later, but now is the time to use some more fusible webbing and fuse them all together so your scarf doesn't slip around when you pull on a strip.
Next, we're going to make a little dealy-bop to cover up those seams and to hold our layers together more securely.  I just kinda made this part up, so I'm not entirely sure it's necessary.  I do kind of like the look of it though.  If my sewing machine was working, I might tell you that it could be a good idea to sew this thing on for when you want to wash the scarf.  But someone took their sewing machine apart in an attempt to oil it because it was making a gawd-awful screech of death.  And then ended up with 3 extra screws and a machine that still squeaks, ah-hem.  Stupid, stupid person.  Anyyyyyyway, cut yourself a piece of shirt scrap that is about 3" x 8".
Cut a piece of fusible web just shy of 8" long and lay it down along the long side.  Fold the edge over to cover.  Iron to fuse it shut.
Repeat with other side.  It doesn't really matter how wide the piece you end up with is, so don't worry about any measurements.
Now we need to make one of the short sides look a little more finished.  Take a small piece fusible web and fold the short end under.  Iron.
Lay your stack of fused strips over your newly-fashioned little strip piece.  Decide how much you'll need to fold over by wrapping it around a couple of times and adjusting accordingly.  Cut off any excess strip from your raw edge if your piece is too long.  I know that sounds confusing.  The next couple of steps should make it more clear.
Fold the raw edge over and put some strips of webbing on top.  I extended the strips to be long enough to fuse the entire finished part I would be folding over.  We want our finished end folded over last so it looks nice.
Fold your finished end down over the webbing and fuse together.
Remember earlier when I said THEN would be a good time to fuse each strip together?  Well, I forgot that part until now.  That's what happens when you're wingin' it!  I realized that the strips could slide left and right, which is silly.  So, I actually cut the strips of webbing and tucked them in between each strip, then heated to fuse after the fact.  Learn from my mistakes, people.
Your scarf is now finished!  Try it on and see what you think!
You can wear it just as is, draped over your neck.  Hmmm, maybe it is a little thicker than I wanted.  
Seems a bit much, no?
Or fold it over itself like you would a 'normal' scarf.  What IS that black dot by my neck?  No clue!  For a minute there, I thought maybe I left a pin in the scarf!  Maybe it's dirt on my camera/phone.  LOL, I just had 
a funny thought!  This would make a great Austin Powers get-up for Halloween!  Shag-u-lous, baby!
And lastly, you could wear it with a little flower you've plucked from a silk plant in your home (oh, yes, I did!!), or with a little handmade flower pouf clip!  
I'm not really a scarf person, but I may become one!  I really like the look of this.  It really dressed up my plain white shirt! Now that it's done, I realize that this wasn't the best material to use.   It did work, but a stretchy, light-weight knit would probably work better, just FYI.  I've seen a couple other simple scarves I intend on trying.  I'll post those when I get around to them, so stay tuned.  Thanks for stopping by!  Now, go dig through your husband's skanky old t-shirt drawer!